Aberdeen & Haddo
A classic day out with ‘the Matthews’
Above: The gorgeous view of Mt. Aberdeen from Haddo Peak, with Hungabee, Lefroy and Victoria in the background.
July 09, 2015 / minute read( words)
Despite not being the tallest among the Lake Louise group I was taken by the imposing figures of Mt. Aberdeen and Haddo Peak during one of my earliest visits to the area, one where I walked across the frozen lake and hiked the first section of a Plain of Six Glaciers trail heightened by a dramatic sunset. In the years that followed I would get many more dramatic views of the pair from mountains such as Fairview and Temple. It was always on my list, I just wasn't sure how I'd go about it given that Aberdeen is known as a classic, and challenging, ice climb.
Over time I found accounts of a possible scrambling route for Aberdeen via its “miserable” southeastern scree slopes – the traditional climber's descent route. The viability of this route was confirmed early in 2015 after a daring, but successful, ski ascent by my friends Ben, Steven and Vern. Later that spring, from the snow-capped ridge of nearby Armor Peak that overlooks Lake Louise, Matthew Hobbs and I hatched a plan to climb Aberdeen before the midseason bear restrictions. To say I was keen for this trip with would be to put things mildly, and that I'd be joined by Matthew and fellow Matthew (Clay) only made it better.
This was easily my favourite outing of 2015.
Routefinding
The Approach
A scrambling ascent of Mt. Aberdeen begins at the Paradise Valley trailhead which has a sizable parking area 2km in on the Moraine Lake Road. This is a seasonal road that opens each year in mid-May, but you will want to wait a few months beyond that date for the avalanche risk to subside along the ascent route. Also, note that this is an active bear area, so definitely bring your bear spray and know that a minimum 4-person group restriction goes into effect by mid-July. We purposely timed our trip to have the driest conditions while avoiding that group-size restriction.
Follow the Paradise Trail from the trailhead along a well-maintained path for a few kilometres (there are a few junctions, but the way is obvious) until you reach a split in the trail pictured in image #2. The sign will direct you towards Lake Annette, but you'll want to step over a few downed branches to follow a decommissioned (but still very usable) trail that continues along the NW side of Paradise Creek. This trail will soon take you past the drainage used to ascend Sheol Mountain.
Although the route was recorded with a GPS unit, this data should only be used as a SECONDARY navigation tool.
A few kilometres later you'll encounter a spot where this trail crosses an un-bridged (and likely roaring) Paradise Creek in the direction of Sentinel Pass. If you take a look at our GPS track, you'll see our descent route varied greatly from the ascent one. This is because we made the mistake of trying to shortcut through the forest on the approach, which was a lengthy, unpleasant bushwhack which eventually brought us to our destination. Instead of repeating this mistake, you'll want to continue the fight along Paradise Creek until you can clearly see the ascent drainage. There will still be sections of bushwhacking; however, these will be shorter and linked by a usable trail, and you'll suffer less.
Mt. Aberdeen
We knew we were in for a hot, hazy day as we reached “The Gates” on Mt. Aberdeen, taking a moment to enjoy the welcome respite of shade and a cold stream before committing to the miles of baking scree above. This feature is precisely why you'll want to wait for any threat of avalanche to evaporate, as a massive amount of this very big mountain would run-out through this deathtrap. I'm sure there was plenty of second-guessing at work when my friends came through there during their bold ski ascent.
Seeing what lied ahead of us, we decided to lighten our load a bit by leaving some gear at this junction, including our arsenal of bear spray. This was apparently such an impressive act of bravado on our part that the resident grizzly bear on the plateau above chose to let us through, unchallenged, before surprising others following in our footsteps a week later. This bear can smell fear, and it smells delicious.

Following a scree trail next to the stream quickly led us past a series of small waterfalls to the basin of a huge bowl area that was already scorching in the morning's sun. This is where the quality suffering begins; the way to Aberdeen's southwestern shoulder is obvious from this point, but 600m of elevation is still to be gained on loose scree and rock. We trended to the climber's left taking advantage of rock steps and snow patches where we could to hasten/simplify the ascent, but it was a lot of work.
One of my concerns with our trip was that we'd have difficulty negotiating the crux downclimb on Aberdeen to reach the glacier traverse to Haddo, even exchanging numerous messages with Steven on the topic to help plot potential bypasses we could attempt (they had scrambled to the southeastern ridge linking Aberdeen and Haddo rather than taking our route). While we grovelled up these slopes I took many opportunities to validate an alternative scramble route. Thankfully this worrying would prove to be completely unnecessary, which was just as well given I could sense my partners had no enthusiasm for exploring Aberdeen's southeastern face.
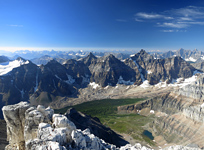
All that grovelling up loose crap was soon richly rewarded when we were suddenly thrust onto the spectacular vantage point that's Aberdeen's shoulder. Whether taking in Temple's immensity, the dramatic sweep of the Valley of Ten Peaks, the dramatically framed horseshoe lake area, or the awesome north face of Mt. Lefroy, the views were simply amazing. Oh, and yeah, there was that whole Valley of Six Glaciers vista to the other side with its giant, glaciated peaks and lakes... you know, if you're into that kind of stuff.
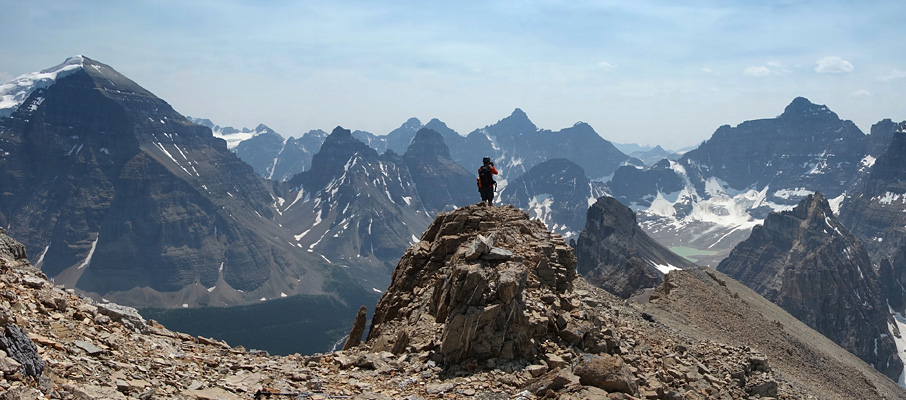
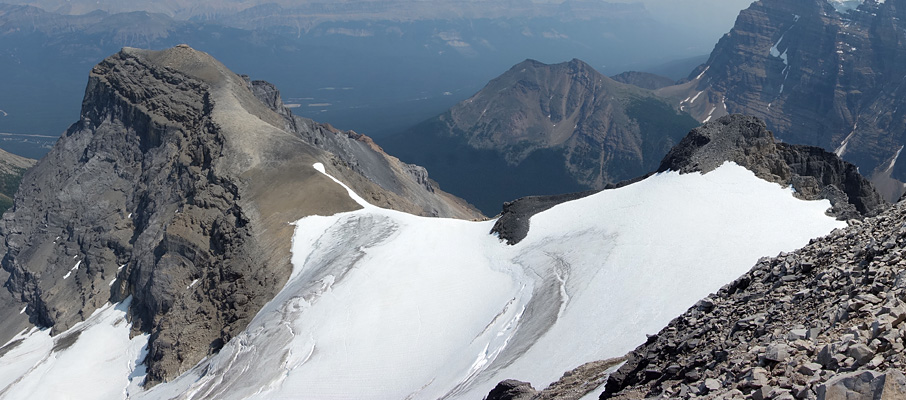
After enjoying a well-deserved break at the shoulder, the three of us pushed on for the last 150m of vertical ascent on rubbly slopes to reach the summit of Mt. Aberdeen and catch our first glimpse of the mountain's northern glacier. While it had taken a lot of physical effort to reach this point (over 1,600m of accumulated gain), the going had been rather easy technically. Eyeing over Aberdeen's narrow eastern summit ridge, and tracing the glacier route over to the distant summit of Haddo Peak, it certainly looked like things were about to get more challenging.
Haddo Peak
If you have the conditions, the gear (for glacier travel) and the time (about 1.5-2.5 hours return), it would be a shame to come all this way to summit Aberdeen and not make your way to nearby Haddo Peak. The views from Haddo and along the traverse are great, the glacier's mellow, and the crux section is rather immediate (and looks worse than it is). Matthew Clay had no ice gear with him and was more than happy to relax at the summit, so Matthew Hobbs and I continued on our journey under the watchful gaze of his telephoto lens.
The crux for reaching Haddo Peak is negotiating and downclimbing Aberdeen's eastern summit ridge to safely reach the glacier below. We found that we had to careful from the very beginning while making the first descent of several metres from the summit to a gully feature that's slowly eroding its way through the ridge (and may form a notch someday). The rock became increasingly loose as we neared the gully, and a slip here might easily have sent us straight off the ridge, from which our misery would only have continued after landing upon a steeper section of the glacier below.
Share this report on:
After stepping carefully past this gully, we continued along a section of rock that was more of a fin than a proper ridge. The rock quality was better from this point of the traverse, but we needed to contend with a significant amount of exposure while making liberal use of the ledges just to the left (north) of the ridge's crest.
I was hugely relieved to see the options available once we reached the downclimb at the far end of the ridge. Ben, Steven and Vern's account of a very difficult downclimb beginning with scaling over an exposed choke stone had sent my mind racing about possible bypasses, but here we were, and I realized immediately that their difficulties were a seasonal dilemma. Right next to their descent path, what had been an impassable steep snow ramp in winter had melted out to reveal a sequence of moderate rock ledges all the way down. Had anyone been standing in front of me at that moment they may have seen hints of a shit eating grin.
Soon, Matthew and I were at the base with our crampons on and ice axes ready, front-pointing our way down the short, but steep upper section of the glacier (mostly out of precaution rather than necessity) and continuing on our way. Because we weren't roped up, we chose to take a very conservative line for our glacier traverse, staying as high as possible near the crest of the ridge. We were well above the bergshrund, we could tell that we were only a metre or two above solid ground, and were at no risk of sliding if we lost our footing. An unexpected benefit of our high traverse was that the ridge offers all kinds of interesting rock windows to frame the valley below and the beautiful surroundings above.
As an unorthodox precaution, Matthew decided to cut himself slightly with his crampon so that we'd have a faint blood trail to follow on our return should a bluebird day suddenly give way to an unexpected total white out. Smart!
After crossing the glacier a quick 70m ascent on dinner plate-like slate led us to the summit of Haddo Peak. While the peak itself is modest in appearance, its views certainly aren't. While you have a commanding view of Lake Louise and the peaks surrounding Saddle Pass below you, Haddo is all about the view back towards Aberdeen and its plunging glacier – it's simply breathtaking.
After admiring that view for a while, and taking the requisite portfolio of photographs, Matthew and I made a sunny return across the glacier, climbed back up the ridge wall, and carefully made our way along the crest to reunite with our other Matthew. With the band together again, it was time to make a quick descent of Aberdeen's rubbly scree slopes and enjoy the spectacular evening light in the Paradise Valley.
Having succeeded on both peaks under fantastic conditions made the long return hike far less of a death march as it could have been, and before darkness, we were back in Lake Louise to enjoy a much deserved celebratory meal at Peyto's Cafe.


")


")


")
")
")

")


")