Mount Northover
Tackling a unique and intimidating mountain.
Above: Heavy forest fire smoke obstructs the northern views as Doug traverses the summit ridge.
August 13-15, 2017 / minute read( words)
It all started quite ambitiously as Alex, Anna and I headed for Aster Lake with plans to tackle six mountains over the course of three days. The first day would see our attempt on Foch dashed by heavy rains moments after erecting our tent. Persistent heavy rain overnight ruled out an attempt on Joffre (a somewhat harrowing account from another group days later showed this as perhaps a fortunate development), and then to round out day two an attempt on the Kane duo of Cordonnier and Warrior ended, breathtakingly, when lightning erupted from a low cloud ceiling overhead. Unfortunately for us, we were mere steps away from the false summit of Cordonnier at the time and had to run for our lives as the thunder roared and sparks flew off the tip of my ice axe.
After making one of the speediest descents that mountain had likely ever seen (at least without skis), we grudgingly returned to camp having gone 0-for-5 on our trip so far. With persistent, threatening skies and no cranberry muffin to cushion our disappointment (inside joke... and not a euphemism), it was hard not to feel pessimistic about any attempt on Northover and we debated packing up early and heading for home. However, Alex was still optimistic that the mountain would dry in time, and there was a chance that Doug could still show up for day 3 as we had plotted, so we hunkered down in our cosy tent and awaited the morning.
We woke to clear skies and the presence of Doug, who had left Red Deer at midnight and was now contemplating us quietly as we hastily scarfed down some breakfast. Northover, it seemed, was a go.
The mountain had been at the top of my mind all that week. Two of my most experienced scrambling friends had described the crux as terrifying. Steven, on the day that Rundle had consternated us to the point that I contemplated the use of my PLB, still insisted that Northover offered worse predicaments. Even those that had tackled the safer descent route both ways still had words to say of it to give one pause. For days I agonized over trip reports and pestered friends with questions in preparation. However, as Alex, Doug and I headed for the mountain (Anna chose to sit this one out) there were only two questions left that mattered: Am I up for this? Am I good enough for this? I was about to find out.
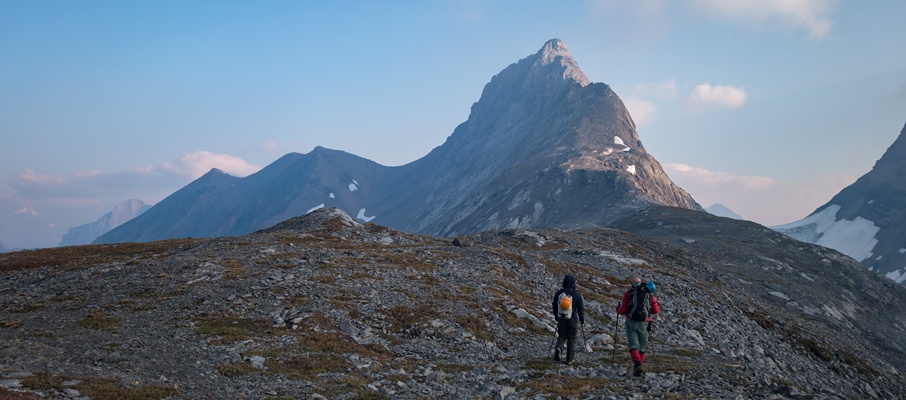
Through the smoke of the morning, I could make out the ghostly outline of Northover's signature horn in the distance. The mountain stared back with indifference.
Although the route was recorded with a GPS unit, this data should only be used as a SECONDARY navigation tool.
Routefinding
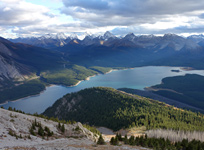
Approach to Aster Lake
Upon arriving at the Peter Lougheed Provincial Park either from the Trans-Canada (via Hwy 40) or Canmore (via the Smith-Dorien Trail) you'll want to follow the Kananaskis Lakes Trail to the Upper Lake parking area. Once in the parking area, head to the furthest lot to the south that's next to a trailhead leading around that end of the lake. Be sure not to leave any valuables or ownership documents in your vehicle here as this is one of the worst parking lots in the Rockies for break-ins. Some people even choose to leave their vehicles unlocked to discourage thieves from smashing a window in order to “take a look”.
The trail around the south end of Upper Kananaskis Lakes is a total highway, complete with a series of new bridges in the wake of the 2013 flood. After about 4 km of easy hiking, you'll find yourself at the unsigned turn-off for Hidden Lake (to your left) where Alberta Parks has freshly completed substantial new trail work. In the past, one would follow a trail to the lakeside and, should the lake have receded enough, find an easy walk around the eastern shores to a path that climbs through the forest at the far end. While this remains possible, Parks has built a nice new trail further to the east (climber's left) of the lake that shouldn't flood and provides an easier ascent route to the valley climb beyond. Those same crews have purposely cut a large number of trees across the old trail to encourage one to use that newer trail. My GPS track here follows the new trail alignment.
Once you're past the forest, an obvious scree/rock debris trail will guide you up the lower slopes of Mt. Sarrail (on the left) and past a series of small waterfalls. Near the top of the headwall, you'll encounter a 3m high pit that you must climb out of; while the scrambling here isn't particularly difficult technically, it wasn't any fun with a heavy pack!
Once you've surmounted the pit, you'll soon return to the forest where following a well-defined, but often meandering trail will eventually bring you to the Aster Lake Campground and its unusual, green outhouse structure. The campground itself is quite nice, but its prime positioning for scrambling, mountaineering, and the popular Northover Ridge hiking circuit ensures that the 5 available tent pads can be difficult to book.
The Ascent
Leaving the camp by headlamp, we soon found ourselves skirting the familiar southern shores of Aster Lake. The trail here's slightly dodgy, involving sections of rock-hopping, slab traversing, and detouring through the steep brush. The going's not too difficult, but one needs to pay attention to avoid an unplanned swim. Once past the lake, we continued along an easy trail to a vast floodplain where, continuing west, we hopped a small stream or two, and aimed for a large drainage between Warrior and Northover ahead.
The top of this drainage connects to the Northover Ridge trail; however, there is no need to go that far. Midway up the slope, we turned to the climber's right, aiming for an obvious ramp that leads to the ridge top. Sticking to the climber's left of this ramp will give you some solid rock to ascend on and a chance to get a feeling for what the rock will be like later on. Once at the top of the ridge, you'll be treated to great views of the Aster Lake basin to the east, the Joffre area to the south, and the Royal Group to your west as you begin an easy, but lengthy hike along the ridge. The only unfortunate thing about this hiking section is that it may give you a little too much time to contemplate the intimidating form of the summit area ahead.
The scrambling on Northover starts late but escalates in difficulty quickly. In the early going you'll be going up steep, slabby ramps followed by flat sections that become increasingly more exposed, but nothing that's technically demanding. My advice would be to pick slightly more difficult lines up those initial ramps to get into a bit of a climbing groove. This was my first time out with my approach shoes and a different set of gloves, and I took advantage of these steps get a really good feel for the grip they offered and to build up my sense of confidence. You're not going to want to doubt yourself or your gear when things start getting real. And they get real quickly.

The Crux Sections
There are two major obstacles between you and the summit at this point: the “corner slab” and the “S”-shaped chimney. That said, the intervening terrain is nothing to sneeze at and you'll know that you're nearing the corner slab once you encounter a series of knife-edge traverses that are similar to Lady MacDonald, but with far greater exposure (particularly to the climber's right).
For Alex and I, the corner slab was the greatest challenge of the day. Imagine a perfect V-shaped roof made out of slab, tilted on a 45º angle, with massive exposure on either side (about 30m on the left to a lower ledge, about 500m to the right to a glacier far below), and needing to travel directly up the crest which is about 6-8" wide at the most. It's a unique and intimidating feature. Thankfully it looks worse than it is, and after watching Alex carefully make his way up, it was my turn give it a go.
I chose to completely ignore the exposure and for, what felt like several minutes, the world narrowed to the few square metres of slab directly beneath me. Rather than being perfectly smooth, I found that the crest had a number of divots and cracks that worked well for handholds and, after experimenting with some different positionings, found that using the flats of my feet as if they were clamps gave me the best purchase on the rock. I slowly made my way up from hold to hold in this fashion, maintaining good contact points as I went. Two-thirds of the way up I began to “adrenaline-out”, suddenly feeling my arms and shoulders becoming weaker, but there was nothing to do but to fight my way through it. I was super relieved to reach the flat beyond and was rewarded with a view of Doug bounding up moments behind me like it was a wheelchair ramp.
Speaking of Doug, he captured video of our ascent on his GoPro and the corner slab segment was the most intriguing to me. It's funny to see the effect of time dilation from different observation points. From my point of view, I was being very slow and methodical in my movements, and recall coming to a complete stop multiple times to either rest or strategize, yet the video (even with the noted proviso of being sped up 4x) surprised me by showing that I visibly kept moving the entire way. Interesting.
Anyway, I've read that it's difficult to bail from Northover once the scrambling begins but don't agree with that assessment. Although it's difficult scrambling, there's nothing that would be particularly harder in reverse until you reach the corner slab. Once you cross it, you're pretty much committed to passing over the summit. Sure, it should be technically possible to downclimb the corner slab, but I can't imagine that not being awkward as hell on some very high consequence rock. Imagining the mechanics of different approaches to such a venture each scored highly on my personal ‘nope’ scale.
The difficulty eases between the corner slab and the summit push which, combined with a timely snack break, gave us plenty of time to reset and prepare for the difficulties ahead. One of the first things I noticed as we neared the S-shaped chimney was that the south face at that point has a rather excellent run-out area. I had read some reports that there was a real risk of “falling off the mountain” if one were to blow this stretch, but that may only be the case if you choose the wrong gully to the climber's right (which may become overhanging) or go searching for more moderate terrain along the left skyline, as the target chimney lies right in the middle of the broad (by Northover standards) south face.

In all my planning for Northover, I was adamant that I wasn't going to try to prove anything by getting fancy and always assumed that I'd be heading to the left to find the scrambling gully Vern described in his report. However, the closer Alex and I got to the S-chimney, the more reasonable it looked to me. After hanging back slightly to give Alex space to tackle the chimney, and watching as he made his way through smoothly, I came to the conclusion that I was ok with doing it. After a few more moves Alex topped out onto the summit ridge and it was my turn to go.
After topping out on a steep slab ramp covered with rubble, one enters the S by climbing into a steep chimney with a wealth of available holds that drifts slightly to the right. Although I had no issues with this initial section, I believe that Doug had a sizable rock break-off on him, so be sure to give your holds a test before committing to them. At the top of this chimney, you must do a rising traverse on an open slab to your left that is downsloping (and angled slightly towards the climber's right), and this is the technical crux of the climb (with the corner slab being the psychological/exposure crux).
When passing through this area, Alex yelled down some advice that I only caught partially; mainly to stay to the left of the crack while doing the traverse. Sure enough, the crack which lines the top of this traverse is a blank slab with nothing to grab hold of but there's more to work with the further down/left you travel on this slab. However, moving in that direction also increases the amount of exposure; so pick your poison. Roughly a metre below and to the left of the crack I found a usable set of shallow holds (we're talking 1-2cm deep) to back up the necessary friction moves I would have to do. A few super careful moves later I was quite relieved to reach the exit chimney. [Alex, I learned, had swung even further out to the left.]
After a few happy moments at the entrance of this final chimney, I had to remind myself that I was still in low fifth-class terrain and that a fall here would be even worse than back on the slab, so it was back to business. Like the opening chimney, the holds here were plentiful and solid, and I soon pulled myself up onto the mellow summit ridge. After making sure that Doug got through the crux safely, the three of us floated to the nearby summit. Interestingly, the summit elevation provided by Alan Kane in his book (3,003m) was nowhere close to the readings we had across three different devices, so I'm not using that measurement here.

The Descent
Share this report on:
It was hard to get a good feel for the descent route from the available reports, but thankfully it wasn't that complicated. Passing the summit you want to head to the northern ridge which is to the skier's right. After a short distance, the ridge started to become a little airy and that's where I noticed a moderate gully to the skier's left which I chose to descend while Doug and Alex continued along the ridge.
This gully eventually came to a 3m high cliff, which I passed by butt-scooching to the edge (on dirty slab) and then front-pointing down in a few steps of careful, but moderate scrambling. It was below this cliff where I was reunited with Alex, who had made his way down a slab ramp from the ridge crest. For whatever reason, Doug continued further along the ridge and was rewarded with a wildly exposed downclimb and a tricky traverse to get back to us in the descent gully.
There's a lot of potential for rockfall in this gully so we carefully made our way down for a hundred metres or two in turns before we spotted the narrow ledge traverse (on the skier's left) needed to reach the mountain's scree exit slopes. There was a bolt along the traverse and thankfully Alex spotted, and then warned us of, some barely visible ice that had built up at a crucial point. A slip at that point, midway across the traverse, can easily result in a 10-15m fall.
Once you've completed that ledge traverse, you're done with the mountain's hazards. After negotiating a few moderate, rubbly steps, we were on to the open scree slopes and made a quick descent to the Mt. Northover/Northover Ridge col. From there, the beautifully packed Northover Ridge trail can be followed all the way along the length of the mountain, past its tarns, and over a short snowfield to the drainage which emerges between Northover and Warrior. Safely back on the floodplains near Aster Lake we could look back on the intimidating form of Mt. Northover and know that we had just knocked off one of the hardest scrambles in the Rockies.
Statistics Note
The stats shown for this trip are from Aster Lake. Tackling this mountain from the trailhead at Upper Kananaskis Lake would result in a very long day with 32.8km of travel and just over 2,000m of accumulated vertical ascent.


")


")


")

")
")
")


")


")


")


")
")