Mount Smuts
Ascending in the right state of mind
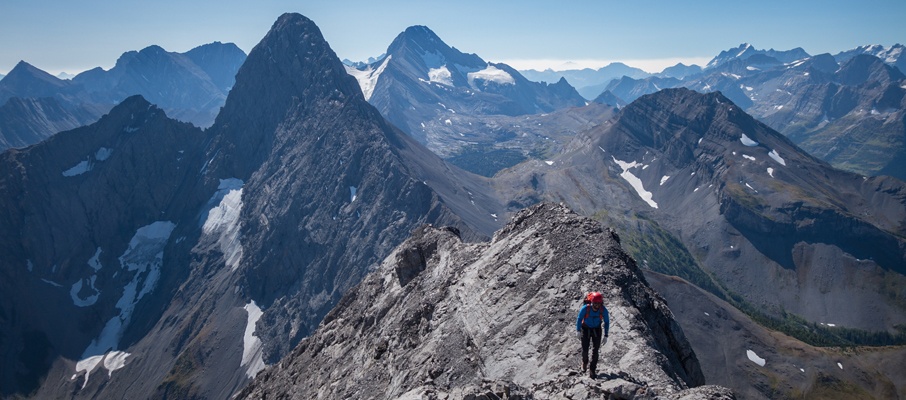
Above: Tamas makes his way along the narrow summit ridge far above the Birdwood Lakes
August 26, 2017 / minute read( words)
When I first bought Alan Kane’s Scrambling In the Canadian Rockies and read that Mt. Smuts was the “one of the most difficult ascents” in the book I quickly dismissed it to my nope pile. Although that was a long time ago, the thought of scrambling Mt. Smuts didn’t merit any real consideration on my part until I had amassed several years of experience. Even then, unpredictable summer weather conspired to nix my hopes and kept me away from the mountain.
It wasn’t until I returned from tackling Northover, another mountain from the nope pile, that I knew it was the opportune time to challenge this significant milestone scramble. I was feeling really positive about how I was scrambling, and that’s exactly the frame of mind you want for an ascent of Mt. Smuts. It can be the difference between having an enjoyable day scrambling a challenging peak or merely surviving through a harrowing ordeal.
Soon after, I could see a weekend forming with suspiciously perfect weather and set some plans in motion. Although I was prepared to tackle the mountain on my own, a change of heart on Thursday lead me to put out a last-minute recruitment call on Facebook, and I was quite fortunate to get commitments from Tamas and Steven (Noël). For the second time this summer, I’d be teaming up with a pair of climbers from Facebook, and for the second time, everything would go smoothly.
Routefinding
The Approach
The approach for Mt. Smuts begins from a trailhead found near the Mount Engadine Lodge, which is located a few kilometres south of the Spray Lakes along the Smith Dorrien Trail. Turn onto the Mt. Shark side-road, and after driving a short distance past a small creek, you'll see the parking area ahead on your left.
Although the route was recorded with a GPS unit, this data should only be used as a SECONDARY navigation tool.
The first three kilometres of the approach is on a broad, well-packed dirt trail that some people choose to bike. I don’t think it’s worth the bother but stash your bike well if you do. The trail from there narrows and winds its way through some woods before following Commonwealth Creek into a broad, open meadow, lying between The Fist and Commonwealth Peak. This meadow has seen many aggressive bear encounters, so be on guard, make plenty of noise, and have your spray ready.
At the far end of the valley, you’ll encounter an area where a monster avalanche toppled hundreds of trees, and it’s difficult to spot where the trail continues. I’d suggest referring to the down track on my GPS route here, but if that’s not an option, look for the path to continue slightly higher on the slope than where you lose it. If all else fails, drop to the creek and follow it along open meadows to circle the base of the forest to find a visible trail ascending to the pass on the other side. Don’t do what we did. I felt that we would have an easier time finding the trail if we poked our way into the forest... and that proved laughably wrong.
Despite the chilly morning (2°C at the trailhead, in August!), we were warmed up and ready to go upon reaching Smuts Pass and its unobstructed view of the climbing route ahead.
The Ascent
A climb of Mt. Smuts begins with the ascent of a long gully with a rock ledge on the climber’s right known as “The Staircase” (see photos 3-5 in the gallery below). This feature, with its grippy rock and plentiful handholds, makes for fast travel and you should reach the mid-point of the gully quickly. Once there, don’t be tempted to leave the gully and cross the main ridge to your right; while this route “goes”, it requires some challenging and very exposed moves before you even reach the first of three significant cliff bands. Instead, continue up the scree gully towards a visible skyline; where this gully terminates (after curving to the right) is where you'll want to gain the ridge.
A few quick notes about this section:
-
If you encounter any traction issues here, due to recent rain or lingering snow, you should abandon your ascent. You need the mountain to be dry.
-
Beware of rockfall throughout this gully if other parties are present. While the debris here is small, the travel distances will surprise.

Although it’s not obvious, you'll be confronted with two route options the moment you step onto the ridge. Following the easy-going crest on the left will lead you to the 5.5-5.6 climbing route through the first cliff band along an exposed rib whereas crossing to your right will lead you to a forking chimney which likely falls in the 5.2 range, and is the established scrambling route. We saw a climbing party ahead of us and headed in their direction along the crest, and by the time we realized our mistake, we were faced with either backtracking or making an exposed slab traverse on a narrow ledge to reach the intended chimney. Weighing our options, we felt pretty good about the terrain we saw ahead of us on the climb, and not so great about that traverse, so we continued along the crest.
Perhaps through miscommunication moreso than maliciousness*, we soon caught up to a member of the other party who had been left behind and was feeling very anxious about their predicament. We took a few minutes to calm her down, adopted her into our group, and then the four of us began negotiating the series of steps up the cliff’s face as a team. The route follows the rib on the climber’s right for a few ledges that required care, but was manageable, before transitioning onto the very airy centre where one encounters the crux (photos 10 and 11 show this area from several metres above). The crux is an exposed 1.5m step with essentially no handholds; making use of some shallow footholds on the rock, you need to lift yourself up and forward enough to use a combination of pressure holds and your upper body’s weight to strategically beach yourself upon the step. We each took our time here, being meticulous with our placements and weightings. A few additional moves from that step conveyed us to an exit chimney where the difficulty eased greatly, and a little hands-on scrambling brought us to a broad flat between the first and second cliff bands. Having met up with the rest of the advanced party, we took a few minutes to chat and rest before proceeding further up the mountain.
* I’ve often seen parties spread out (beyond visual and yelling range) in difficult terrain on the assumption that the other person(s) know(s) what they’re doing. This is a dangerous assumption to make, especially when the terrain requires routefinding.
The worst part about the second cliff band is the entry, which requires traversing an exposed, shallow rocky ledge to gain a broad chimney on the climber’s right (shown in photos 12 and 13). The chimney narrows and becomes easier to climb as you get higher, eventually reaching a small flat section at the top.
The transition from the second cliff band to the third follows a narrow, ramp-like balcony that provides an open view down Smuts’ plunging east face. Higher up the cliff band, the ramp splits into two, with a ramp continuing to the right along the face, and a narrow chimney cleaved into the mountain on the left (photo 16). We found that taking the ramp for a short distance and then traversing back to the chimney a little higher was the easiest way to go. The upper section of the chimney is quite tight which, aside from providing lots of choice between easy holds or stemming, made it feel quite secure to climb. Once we topped out, a moderate traverse on some slabs brought us back to the centre of the ridge for another well-deserved break.
With the three major cliff bands surmounted, all that stood between us and the summit was an undulating ridgewalk with a few moderate hands-on sections. It was during this ridgewalk that a near-disaster struck as I was attempting to return my camera to its protective pouch and somehow... missed. I watched helplessly as it hit the ground before bouncing down the east side of the mountain. Out of sheer luck, it came to a stop on the last accessible ledge before the east face plunges hundreds of metres. Hoping only to recover the memory card, I was amazed to not only find my Sony RX-100 in one piece... but still functioning! What a little tank!

The conditions were beautiful at the summit and, after spending some time celebrating and relaxing with the other climbing party, we were soon joined by two others! Perhaps a reflection of what’s happening with Alberta’s mountain parks in general, I imagine that this was the first time that Smuts (known for having only a handful of summiting parties a year) had 13 people on its summit at the same time, let alone on the same day!
The Descent
Share this report on:
While researching for this trip ahead of time I found a lot of different descriptions of where the descent begins on Mt. Smuts, some of which (“second gully on the left” or “first gully on the left after descending the ridge”) could easily lead one into trouble. From the summit cairn, you want to follow the ridge as far as you can until the easy scrambling ends and the ridge plunges downwards to a col between Smuts and Mt. Shark. A few metres back from that point on the skier’s left (west) side you will find a 5-6m wide gully that descends on a diagonal to the skier’s right (north); parallel to the ridge crest and heading towards that col. The top of this gully had a cairn and a bolt when we passed through.
While the descent gully does have a few short downclimbs that require front-pointing, the main risk there is rockfall. The three of us descended in a very coordinated manner with a lot of communication, staying close together at some points, and sending members one at a time to reach a protected spot during others. About halfway down the gully, the next climbing party arrived at the top of the descent and, to their credit, agreed to wait until we signalled that we were clear of the gully before proceeding. When the gully ends, you’ll want to traverse a narrow ledge to the skier’s left that will bring you to Smuts’ broad and, unfortunately, concrete hard scree slopes.
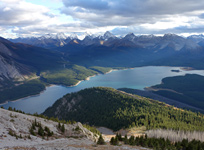
Clear of the last danger, we came to a rest on a flat below the slopes and basked in the beautiful weather and exceptional views of the majestic Mt. Birdwood, its emerald lakes, and the many peaks beyond. Seated there, we gazed back at Smuts and were surprised to see a lone climber, and not from one of the other climbing parties, striding towards us rapidly like the T-1000 from the Terminator movies. We chatted with him briefly and discovered that he was none other than David Jones. Yes, that David Jones. Warmed up by his turbo ascent of Smuts, and a solo ascent of Birdwood the day before, he was soon off to investigate Smutwood at a torrid pace because it was there, and he was David Jones.
The other climbing party arrived soon after and we walked out together to discover where our group had gone wrong on the approach to the pass, and then there was nothing left but a pleasant hike out to end a fun and memorable day in the mountains.


")


")


")


")
")


")


")