Mount Athabasca
Getting a proper introduction to mountaineering
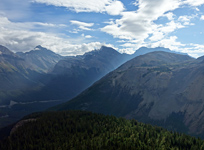
Above: A gorgeous morning view of Athabasca from a former public lookout that was sold to some corporate assholes.
July 7-9, 2012 / minute read( words)
One of the most photographed mountains in the Canadian Rockies, Mt. Athabasca soars over a kilometre and half above the busy Icefields Tourist Centre and dominates many sightlines around the Athabasca Glacier. With a peak elevation of 3,497m, Athabasca has the distinction of being the 12th tallest mountain in Alberta, and among a group of 52 giants, known as the “11,000 footers”, that are the highest in the Canadian Rockies.
Flanked on all sides by glaciers, Mt. Athabasca is a mountaineering ascent that requires an ice axe, crampons, ropes, and the skills and experience to safely navigate both glacial and avalanche-prone terrain. As this was going to be me my first real mountaineering experience in the Rockies, I chose to tackle Mt. Athabasca as part of an introductory mountaineering course offered by Yamnuska Mountain Adventures. Climbing in early July during a heavy snowpack year, the weather and conditions were perfect, the course was excellent, and the views were... as you can see... spectacular!
Course Information
The course I participated in is called the “Snow & Ice Weekend”, a three-day program which devotes the first two to learning essential snow and ice travel skills, including crevasse rescue, and then provides an opportunity to apply those skills over a substantial climb on the third. The target summit of the course is Mt. Athabasca; however, if conditions are poor, or if either you or the guides are concerned about your ability to complete the climb, then the objective could change to A2 (a sub-peak of Athabasca), Boundary Peak (another sub-peak, lower than A2), or nearby Mt. Wilcox.
For those who need it, Yamnuska provides all of the technical gear necessary to complete the course, including boots, crampons, ice axes, helmets and harnesses (and a few related accessories). I already had most of this gear, so all I needed was a harness and the related accessories: a trio of prusiks, an ice screw, a sling, and a selection of regular and locking carabiners. People who had to rely on the loaner boots had mixed experiences; they were perfect for some, while others suffered despite switching boots (the guides brought a number of extras, although they were mostly the same brand/type). If you can procure your own boots (comfortable and capable of extended crampon use), that would absolutely be to your advantage.

It's assumed that you'll have the necessary technical clothing and gear (such as a headlamp and sunglasses), and food and water for each outing during the course. That said, Yamnuska does a good job of informing you of what to bring well ahead of time.
The first day of the course was spent inspecting the gear and learning how to rope up for glacier travel, how to safely travel on snow slopes, and how to rescue someone from a crevasse with my guide Richard Howes. Working on a steady slope at Parker's Ridge (across the highway from Nigel Pass), we practised climbing with an ice axe, plunge-stepping, boot skiing, glissading, and how to self-arrest from several different starting positions. We then practised crevasse rescue further up the ridge, learning how to build anchors in the snow by using our ice axes.
The second day saw the course move to the “Little A” Glacier between Mt. Athabasca and Boundary Peak, where we did a number of exercises to become comfortable using crampons, learned how to cut steps using an ice axe and how to place ice screws, and then did some in-depth crevasse rescue work where we simulated all three positions in a three person rope team. Our day ended a little earlier than the one before, allowing everyone to get a decent rest in advance of our planned alpine start for the next day.
Although the route was recorded with a GPS unit, this data should only be used as a SECONDARY navigation tool.
Ascending Mt. Athabasca
Our climb began at 3:30 am from the climber's parking lot, on the Snowcoach Road next to the Athabasca Glacier. The route follows the road up to the main “transit station”, from which you begin following a worn trail along the lateral moraine to your left. This path isn't too difficult, but you need to keep an eye out for a few badly eroded sections (and their precipitous drops) as you scamper up in the darkness.
By the time we reached the scrambling section next to a large glacial ice fall, the sun had risen enough that we no longer needed the headlamps. The climbing through the rock bands here is really quite easy by scrambling standards, with minimal exposure, and very soon we found ourselves at the beginning of the glacier traverse. Our group of four — including our guide Barry Blanchard, myself and then Peter and Louise from Calgary — roped up, and began following one of the teams that were ahead of us.

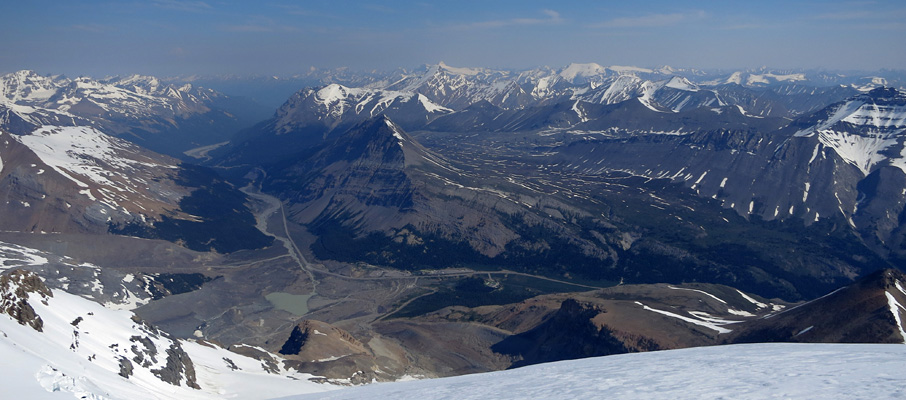
Thankfully the glacier was in excellent shape at this time, with minimal crevasse risk and shin deep snow that already had some tracks for us to follow. Within a half-hour, we had traversed the glacier and were looking up at the steep gully ascent to the A/A col (Athabasca/Andromeda). Once again we benefitted greatly from the two teams that were ahead of us, as they graciously kicked steps and then improved them for us as we made our way up behind. It took a while to crest the ridge, switchbacking back and forth across the slope, but we were then treated to our first views to the east and northeast.
After a brief break, we donned our crampons and began to lead the teams up a more gradual slope towards the Silverhorn — a sub-peak of Athabasca that lies above 11,000 feet. The slope wasn't particularly icy, but the crampons helped us break through an inch or two of crust that had formed upon the snowpack, and the extra traction they provided certainly wasn't doing us any harm. Soon we were over the top and looking at the impressive ascent ridge leading to Athabasca's summit. Narrow, exposed, and with a fair amount of cornicing to the climber's left (east side), we exercised a fair amount of care while passing through and were soon on the summit, enjoying incredible views in all directions. It had taken us 6 hours to reach the summit at a relaxed pace.
Share this report on:
We retraced our route for the descent, sometimes following the same steps, and sometimes diverging to plunge-step through fresh snow to hasten the downclimb. Dropping down to the glacier from the A/A col was a bit more challenging, as the snow had softened in the warming air and was quite deep. Plunge-stepping here required good balance as you would often slide a bit after placing your foot down. Once we had descended about 2/3s of the way, we chose to glissade the rest of the way to the glacier. From there, it was mostly a walk out to the climber's parking lot where we had started the day, 10 hours earlier under the moonlight.
The A/A Col route is just one of several ways to achieve the summit of Mt. Athabasca, although the easiest. During low-snowpack years, a limited window of opportunity can develop in late August/early September where the entire route can be done as a scramble, without glacier travel. However, this should only be attempted by experienced individuals as you'll be exchanging crevasse-related risks for significant rockfall danger as you contour along the cliffs to the climber's left of the glacier.
You can find out more information about the Yamnuska Snow & Ice Weekend program at their website.


 and Tangle Ridge")
 and Nigel Peak")


 Towers Above Mt. Andromeda")