Mount Chephren
“...the idea of the experience continually built-up in my mind.”
Above: A spectacular view from Chephren's summit beyond White Pyramid towards the giant, Mt. Forbes
August 31, 2013 / minute read( words)
Following my first summer of scrambling in the Rockies I picked up a copy of Alan Kane’s ubiquitous Scrambles in the Canadian Rockies and proceeded to consume it voraciously over the winter months where I had little better to do. Amongst the 150-odd mountains profiled in that book there were dozens that interested me, but there was one in particular that captured my imagination.
A beautiful horn-shaped mountain, Chephren towers over the Icefields Parkway midway between Saskatchewan River Crossing and the Bow Lake area and promises a difficult approach, a harder climb, a summit just shy of 11,000 ft., and spectacular views. A reading of its description constructed in my mind an alluring vision of danger, adventure and reward that drives people to push further and harder. Chephren became my goal mountain and I spent much of the next two years working towards being “ready for it” while the idea of the experience continually built-up in my mind.
After missing an opportunity with friends in early August, and then getting bumped from an ACC section trip (due to limited backcountry permits) that would ultimately fail in poor weather, I decided to make the most of improving conditions at the end of the month to make an attempt on the mountain as a solo day trip. While I proved to be physically and technically ready for the day, a summer of working long hours and going hard every weekend had taken a significant mental toll… and mistakes would be made.
Routefinding
The Approach
An ascent of Chephren begins at a parking area adjacent to the Waterfowl Lakes Campground, which can be found 56km north of the Icefields Parkway gates near Lake Louise, or 19km south of Saskatchewan River Crossing. After sleeping the night before in my car at the trailhead, I set out at 5:30am and followed it down towards the Mistaya River where I soon crossed a bridge. From there I followed the trail for 1.3km towards a junction leading to either Cirque Lake (to the left/south) or Chephren Lake (to the right/north). From that point it’s another 2.2km to the shores of Chephren Lake.
Although the route was recorded with a GPS unit, this data should only be used as a SECONDARY navigation tool.
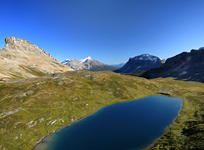
If you’ve ever contemplated making the 7km roundtrip to Chephren Lake as a dayhike I would recommend against it. The hike to the lake is viewless and uninteresting, and the point where you arrive at the lake isn’t particularly scenic. The nicest views of the lake certainly come from the western half, which take a significant amount of effort to reach.
Navigating around Chephren Lake to the moraine flats beneath Howse Peak is a slow and challenging hike. You begin by following a winding, sometimes vague, sometimes overgrown trail for a while, and then you get to side-step across a steep avalanche slope before a seemingly never-ending boulder hopping section brings you to the far side. Even at a steady pace, travelling from the east end of the lake to the west (a distance of 3.5km) would take me over 2 hours.
The evening before had seen some significant rainfall in the region, and the worst part of the approach was the sodden vegetation along the route, which left me soaked to the bone from the waist down. That combined with almost the entire approach being in the shade left me a little chilled by the time I reached the broad west end of the lake.

The Ascent
Happy to be past the unpleasant boulder hopping section I made my way quickly across the flats and two glacier-fed streams (both of which can be difficult to rock-hop) to the ascent moraine slope somewhat visible in image #13 (distant left) and featured in image #15. This moraine feature is cement hard, a bit exposed, and no joy to ascend. However, it did get me out of the shadow of a high ridge between Cirque and Chephren Lakes and into the sun where I could begin to dry and warm up.
After spending most of an hour drying and re-energizing I completed the moraine ascent and came around a corner where a drainage from Chephren signaled the next phase of the climb. I don't believe there's a wrong way to climb around this drainage and its waterfall, but I would suggest sticking to the climber's left if for no other reason than the lovely view in image #19.
The perspective you'll get of Chephren from above the waterfall can easily fool. What looks like a pleasant grass meadow with a slight hill climb towards the end (as seen in image #20) is in fact an extremely foreshortened view that hides the fact that there's 700m of vertical gain between you and Chephren's first major cliff band, including a fairly continuous series of minor rock bands before you reach its base.
In my preparations for this trip I studied four trip reports, all of which explicitly based their routefinding through the monster first cliff band on an abandoned rope someone once used to rappel. Two of these reports were (at the time) less than a few weeks old. The problem for me was after several minutes of searching, I could find no sign of a rope at the bottom. Nor would I find one from the top later. It's possible that I missed it somehow, but I doubt it. Do not depend on finding a rope.
The Key to the First (Crux) Cliffband
There are two scrambling routes through this cliff band and both can be found by following the Y-shaped drainage that’s a very clear landmark on Chephren’s south face. The right branch of the Y leads to the beginning of a difficult line which concludes with a few moves approaching a climber’s scramble. The left branch of this Y leads to the easier route, which despite its name, is still a difficult scramble but with less exposure and a bit more choice in terms of line. This Y can also be seen from above the first cliff band and can help to pinpoint descent points later.
One thing to note about the “easier” route is the amount of loose debris. I remember a climber I met on West Baldy describing the ascent ahead as being dirty. Well, if the Kane route on West Baldy is dirty, this line is filthy, if not downright sleazy. While I don’t recommend soloing Chephren, a 6-person group in that gully will be a gong show where someone will always be getting pelted with falling rocks and stones (Pro-tip: lead on ascent, follow on descent).
Of course it would turn out to be one of the day’s ironies that the book that inspired me to climb this mountain was the one source I had failed to even look at during my preparations and, which through its photograph alone, very clearly shows the easier line through the first cliff band. After fumbling about the base of the cliffs in my futile search for a non-existent rope, I decided that I was sure where the difficult line started, and rather unsure as to where the easier one started. So I took the route that I had read about in Steven’s and Eric’s reports.
As seen in images #25 through #27 the difficult route involves a continuous sequence of near vertical, but manageable steps where the exposure creeps upwards with the height you gain. Roughly 10m below the top of the cliff band I got a few metres off-route and needed to make a series of friction moves to traverse a slab section. It seemed challenging but reasonable at the time, until I got a good look at the area (visible in the upper left) in image #28, had a “Rundle moment”, and decided that an alternative descent route was going to be a wise move on my part.
Regardless of your route through the first cliff band you’ll be traversing across a broad sloped shelf to the climber’s right towards a weakness in the second cliff band. Seen in images #31 and #32, the scramble through this weakness is moderate in difficulty and passes by quickly. From the top of the second cliff band you’ll gradually make your way up scree slopes towards the third cliff band, and the final difficulty between you and the summit.
While I was surveying the remainder of the scramble I made the fateful decision to drop a few of my heavier items at this spot, certain that I would be coming back this way.
I knew of two routes through the third cliff band, a moderately difficult chimney to the climber's right near a phallus-like rock from Eric's report (see image #36) and of an easier gully somewhere to the climber's left that Steven and Andrea had taken. Given that the phallus-like rock was easily identifiable ahead of me I went there and found the ascent chimney roughly 10m to its left.
This chimney is steep, but has a series of good rock steps that would make for some quality scrambling... if they weren't covered in snow and ice (images #37 and #38). Unfortunately, the shape and position of this gully is such that it receives almost no direct sunlight and, thanks to the recent rains, it had left a nice layer of snow and thin ice over most of it. As it's pretty easy to control your hand and feet placements on an ascent, I pulled out my ice ax and used it to "clean up" the holds I needed to make it through and was soon on easy scree slopes to Chephren's 3,280m summit.
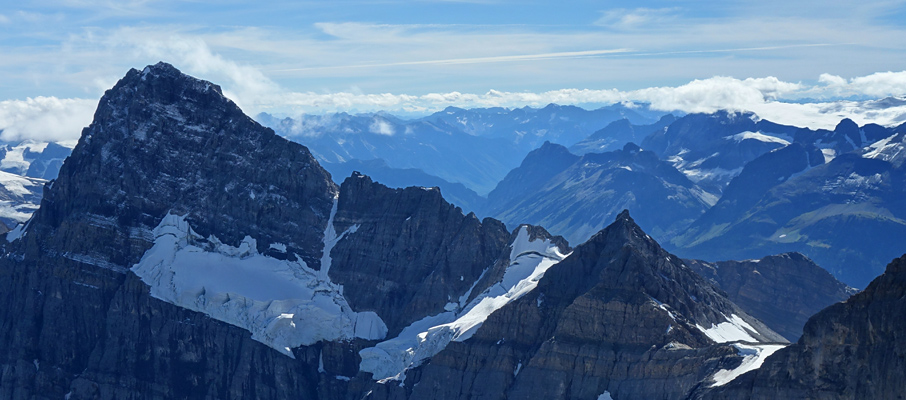
While the Howse Pass area gets very little affection in guide books, the view of this valley from above 3,000 metres, where you can see the dramatic separation between the Wapta Icefields and Yoho National Park from the Conway and Mummery Icefields, is simply spectacular. To have enjoyed this view from White Pyramid in winter and Chephren in the summer, both under perfect conditions, is something I’ll always be thankful for experiencing.
Descent Misadventures
After a solid rest I began my descent down the scree slopes in the general direction of the White Pyramid/Chephren col (image #53) as, after seeing the ice in the earlier chimney, I knew I wanted another way down the third cliff band. As I neared the cliff band I was presented with a variety of gullies to descend, most of which look promising.
The first two gullies I descended were steep, rather loose and, to my chagrin, both terminated in 8m cliffs at their very base (images #54 and #55). After wasting a lot of time, downclimbing and then climbing these, I decided to head all the way down and to the skier's right to a snow slope that I had seen on my ascent only to discover a dry slope immediately above it that I could just walk down (image #57, it was hidden from view both on the ascent and descent). Note that you could easily require crampons here even in late summer, as the snow slope has runs out over a cliff and on to a glacier.
From this point I should have simply traversed to the skier's right below the third cliff band and back to my ascent route, but instead I decided I'd take an easy line down another cliff band on the western face of Chephren where I thought I would then easily traverse back to my ascent route. While this route was fairly easy when I traversed across the western face to where I thought I'd find the ascent route and the stuff I left behind I instead found myself cliffed-out below on a corner of the western face.
Perplexed, and with only a few options, I climbed the scree slopes directly above me and after gaining 80m discovered that I had reached the shelf above the south face's first major (crux) cliff band and that I had completely bypassed the second cliff band via this descent route. The problem was that I had stuff above the second cliff band that I still needed to recover.
For reasons I can't really rationalize at this time, I made the brilliant decision to leave my remaining gear at this spot in order to quickly run up the west face above me, recover my other items, and then run back. This plan backfired slightly when I went to climb the cliff band I unnecessarily bypassed earlier on the west face and found that it required a few difficult moves on overhanging terrain. Thankfully I was still scrambling really well and soon reached my stuff at a point further above it.
However, it soon dawned on me that if I had kept my pack with me, I could have simply descended the regular route through the second cliff band from this point and been merrily along my way. Instead I now had to downclimb that sketchy cliff and make my way back to my pack. The lesson to be learned from all this is to never leave an item behind that you're not willing to say goodbye to; that you'll return along a specific route is not something that should be assumed. This alone would have saved me an hour of daylight and, as I would soon find out, daylight was quickly becoming an issue.

Another important thing to know about Chephren is that the 3,000m+ high shoulder linking Whyte Pyramid and Howse Peak means that darkness will fall on the first cliff band and the areas below much sooner than you would suspect. While I was screwing around in the sunshine on the western face of the mountain, the crux downclimb awaiting me on the south face was getting progressively darker. Which was a problem given I wasn't sure where it started.
I searched for a while above the crux first cliff band, beginning with another futile look for the mythical rope (although I at least found a rap station where the rope may have hanged from), and then for the gully that would lead me down via the "easier" route. The problem was that the three gullies to the skier's left of this rap station all looked the same.
The first one I tried to descend came to an unceremonious end at a 30m cliff, so back up I went. This wasted more time and I was beginning to get really nervous about darkness (note that my photos for this section are using HDR, longer exposures and other camera-based trickery). When I dropped into the second gully (and dropped in is a good description as none of these 3 gullies are easy to enter/exit) I felt that if this one didn't work out, I might get one more chance somewhere else before I'd face the likely reality of having to spend the night on the mountain. I was equipped reasonably for this, and the weather was fine, but that would be long night regardless.
Share this report on:
Thankfully this second gully turned out to be the right one and, after a long and careful downclimb, I found myself on the mellower southern slopes and felt greatly relieved. I still had a long way to return and just made it past the boulder field next to Chephren Lake before I was completely engulfed by blackness and had to do the rest by headlamp. I wouldn't arrive back to my car until after midnight, 17 hours after I had left, but I had summited Chephren and that was pretty cool.
Further Considerations
Most people tackle Chephren as a 2-day outing and setup camp on the flats below Howse Peak on the west side of Chephren Lake. It's a beautiful spot with lovely views and easy access to fresh water flowing from Howse's glacier.
Mountaineers can also attempt to bypass all three cliff bands during winter by ascending the glacier to the White Pyramid/Chephren col and then kick-step their way to the summit. This has the added benefit of crossing a frozen Chephren Lake.
Further Reading
It's best to refer to Alan Kane's description of Chephren in the Scrambles in the Canadian Rockies book (page 300) prior to attempting the climb.


 Way Through")


 near the phallus rock (right)")


")