
Peveril Peak
“One of my biggest 180º turnaround days in the mountains.”
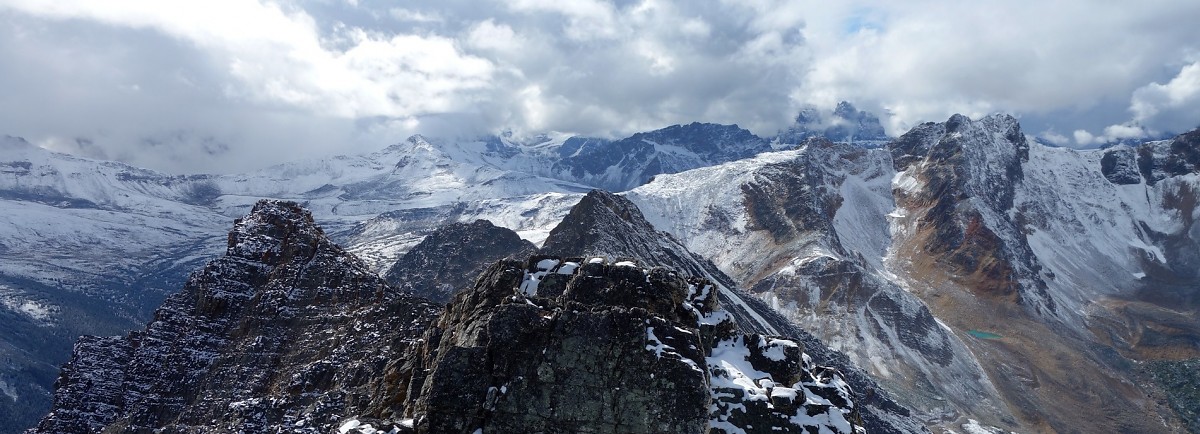
Above: The westerley summit view on Peveril Peak towards the Ramparts
September 14, 2015 / minute read( words)
The forecasts called for dreary weather all day and that call was looking pretty accurate as I rolled up to the damp trailhead at Portal Creek. I felt no enthusiasm for the day ahead, evidenced by a highly uncharacteristic 10:00 am start, as the only reason why I found myself at this location in Jasper National Park was to test out a new medical tape/thicker sock combo on a pair of boots I assumed were destined for a swift return to MEC. I mean who gets amped up for an equipment test on an easy traverse of a local ski hill in poor weather?
Little did I know that the day had something very different in mind for me than a hiking ascent of Marmot Mountain, home of Marmot Basin, via the “exotic” Marmot Pass route to the west.
As I made my way up the Portal Creek trail and past the snow line from recent storms the local mountain conditions and various terrain challenges would gradually force me to abandon my plans for first Marmot Mountain, then Terminal Peak, then Lectern Peak, and then, lastly, Aquila Mountain as possible objectives for the day. Peveril itself was never a consideration as Steven and I had already bailed on it once before on a rainy day fearing slippery quartzite scrambling, and now that it would be plastered in snow with the potential of rain there was simply no way. Right?
Peveril was one of my top 6 scrambling objectives planned for 2015, but with the mid-September snows, I had all but conceded that my window of opportunity had closed. Based on some helpful tips from recent acquaintance Sean Prockter, I managed to locate the terminus of the climber's descent route on Peveril Peak while meandering towards Lectern Peak on the trail and... it looked... suspiciously dry. It looked suspiciously dry well up the mountainside.
As though I was on the cusp of throwing myself towards an obvious trap, I took a quick look around, and sneakily began my ascent of the mountain. It would be an excellent decision, likely my best of the season.
Perveril Peak will forever be remembered by me as the “Karma Climb” as everything that happened that day seemed so improbable that I can only assume it was a mystic reward for having done something right.
Although the route was recorded with a GPS unit, this data should only be used as a SECONDARY navigation tool.
Routefinding
The Approach
An approach to Peveril Peak begins at the Portal Creek trailhead on the Marmot Basin Road. To reach this area head south from the Town of Jasper on the Icefields Parkway (Hwy 93), past the park gates, and turn right on Hwy 93A (there's a sign for the Marmot Basin ski hill). Follow this road for a few kilometres and turn right onto Marmot Basin Road at the first intersection. After about 7km of driving up this switchbacking road, it will descend towards a bridge with a parking area to its left. This is the Portal Creek trailhead, and you should have a nice view of Peveril Peak as the striking profile of its east face dominates the valley ahead.

Once you're ready to go, you can start the trail at either the south end of the parking area or cross the bridge and head left on the other side. Both trails options link up quickly on the northwest side of the creek, and from there begins an easy 4km hike along a good trail to reach the rocky lower slopes of Peveril Peak. Those heading for the 5.9 alpine climb of the east face will begin their ascent around this point, while scramblers will need to continue along the trail around to the southern face.
After traversing a large open area (directly across from Lectern Peak), the Portal Creek Trail heads back into the forest for a while before it arrives at a wide-open 150m section below a major drainage. The drainage extends all the way down to the creek below, and the spot should provide your first open views of Maccarib Pass and the upper section of the valley. A faint trail on the climber's right of this drainage is the beginning of the scrambling route or the ending of the climber's descent route depending on your perspective.
The Ascent (Scrambling Route)
Viewing the sequence of images (#8 through #17) will give you the best sense of the ascent route on Peveril. It's like a series of four slanted terraces where you trend to the right on easy terrain for a while, before cutting to your left to ascend to the next terrace via some moderate/difficult scrambling.
Starting from the Portal Creek Trail, I made my way up on easy slopes to the right of the drainage near, and at times amongst, some low shrubs and then dropped into the gully at the top of the hill where it narrows between rock bands. The scree in the gully is quite loose, but I was able to avoid the worst of it by drifting onto rock on the climber's right. When you emerge at the top of this gully next to some small pine trees, follow the immediate slope to the climber's right. From here on up be sure to take a good, long look behind you at key junctions and every once in a while in between, as it's easy to go wrong on the descent.
As you make your way along bits of trail and past small cairns you'll soon arrive beside a rock rib to the climber's left that you will need to cross over to reach the next ascent gully further to the left. There are a lot of options for navigating this area. Upon spotting the cairn high to your left, you can either navigate your way to it directly (which may require a few moderate/difficult moves depending on the line chosen), or you can continue up the slope and then look to circle back on an easier horizontal ledge. If you slavishly follow my GPS uptrack you'll continue up for a while, before cutting back left on a horizontal ledge a good 10m above the cairn and then have a few awkward moves to gain the rib crest. That also works.

From the rib crest, carefully descend a slab ramp and then make your way up the gully for a while before gently trending to your left, aiming for an easy scree ramp between two large rock outcrops (roughly 130m above your initial position). At the top of this ramp, you'll find yourself at the base of large cliff band with a series of exposed, shallow ledges that lead to a gully on your left. The exposure is minor at the beginning of these ledges, but it quickly grows to over 20m by the time you'll intersect with the gully. The gully, on the other hand, is quite steep where things intersect, but moderates as you get higher. This is the crux of the scrambling route, with the trickiest moves required when transitioning between the ledges and the gully.
It was my luck that the ledges were dry on this day (although I did have icicles sloughing-off overhanging rocks above), and there was only a light amount of water running down the centre of the gully. This would have been very dangerous to negotiate if either the gully or ledges were snow covered. I would take a lower line on the ledges during my ascent, but a higher one on the return to avoid front-pointing/downclimbing the narrowest, most exposed section of the gully.
Above this gully lies a large open slope that where you'll head upwards and to the right before reaching a weakness in the next cliff band on the left as you near the top (see image #14). The weakness is quite steep, and a mix of moderate and difficult scrambling is required on solid rock steps to ascend it (see if from below in image #15, and above in #27). This would be tricky with snow, but it was thankfully dry for me. If for some reason you don't like the looks of this weakness, I did note a 1-2m wide ramp about 100m west (climber's left) of this spot that looked like it might go, and should only be of moderate difficulty. Unlike other aspects of the day, I found no need for a Plan B here.
Once you've topped out above that cliff band you'll have reached the last ‘terrace’, and can enjoy the easy hike up to the summit cairn nearby to the right. The rock around the summit was slabby, wet and a little slippery, so I exercised care with my movements; especially after I got a look at Peveril's north face from above, which I would later describe to a friend as being a similar experience (I imagine) to poking one's nose over the edge of a 70th floor balcony. The alpine route on Peveril has a reputation for being rather “airy” as it nears the top, and I certainly don't doubt it.
With a surprising amount of blue sky above me, I took in the views, signed the register, and enjoyed the moment as much as possible. What a day! I retraced my steps down the mountain (specific notes below) and floated along the trail back to the trailhead, back to town, and then on to some richly delicious victory pizza.

The Descent
It can be very easy to get the descent route wrong on Peveril Peak, particularly if you didn't scramble up that way. The south face route of the mountain is essentially a series of four slanted terraces, almost all of which divide into multiple gullies as they descend and are each linked by short downclimbing sections on the skier's left. The biggest problem is that, on a couple of these terraces, the most heavily travelled trail in the scree heads down the wrong gully. Given this, be sure not to blindly follow tracks in the scree as there's clearly been a strong history of people assuming the previous climbers knew what they were doing; which in turn, has likely resulted in a solid legacy of unnecessary rappels.
Images #26 through #33 below provide a solid visual walkthrough of the descent, and it should also be noted that while there are many cairns along the route, the majority of them cannot be seen from a distance above and only help to confirm that you're in the right place.
The descent from the summit begins in a very straightforward fashion, following a scree slope down to the southwest for a short distance to the top of a gully on the skier's left. This steep gully quickly transitions to a 10-15m downclimb, requiring some careful moves in the bottom third. It may be possible to bypass this downclimb by seeking a moderate ramp roughly 100m further to the west along the top ‘terrace’ that cuts back in the opposite direction.
Upon reaching the next terrace, follow the fall line to the southwest (skier's right) and when the slope begins to split into two, stay left, even though this is the first of two places where it looks like most people went right. Choosing the correct branch here will lead you past a cairn and into a gully that descends to the southeast. This gully will steepen as you descend and when you reach a bolted rappel station, you'll know that you've reached the crux.
The gully below this station steepens, narrows considerably, and then terminates over a substantial drop (see images #12, #13 and #29). What you want to do is only descend the gully as far as you need to in order to transition onto the open ledges to the skier's left; where you'll need to traverse a few metres, drop a step, traverse, drop a step, etc... until you reach the safety of the scree below. The exposure decreases quickly as you traverse to the left but, if you have the gear, your safest move here would be to rappel.
From the base of the crux ledges, you'll want to continue to the skier's left over a small rise and down the scree ramp on the other side (if you rappelled this section, you'll need to re-ascend 10-15m on scree to your left). At the bottom of this ramp is the second place where the busiest trail heads down the wrong gully. As the terrace splits into higher (right) and lower (left) drainages that curve to the southwest, ignore the herd and head left to the lower drainage. Near the bottom of this, you'll be travelling next to a rockfin on your left, when this ends, look to your left and you'll see a slab ramp leading up to cairn.
Share this report on:
Past the cairn, on the other side of the rockfin you can choose to either scramble down directly via a variety of lines, or you can traverse to your left on the ledge and then turn back to your right once you've found easier terrain. Once you're off the fin, you'll want to follow the visible rock cairns towards the middle of three descent options which you should be able to visually connect to the drainage that tirelessly reaches all the way down to Portal Creek. The drainage has plenty of loose rock and scree to release, which I was happy to bulldoze as I had the mountain to myself. After passing through a narrow section which breaks through the last cliff band, swing out to open slopes on your left and follow the faint trail there to the Portal Creek Trail, and your path home.


")

")


 along the Portal Creek valley")

")


