

Little Yoho Valley II
Tackling an entire skyline at the valley's end.
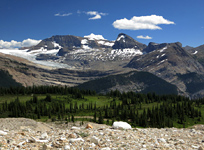
Above: The spectacular western panorama towards Roger's Pass from the summit of Kiwetinok Peak
August 04, 2012 / minute read( words)
Our second day in the Little Yoho Valley proved to be a very ambitious one as Steven and I set out to summit four separate peaks at the western edge of the valley; a trip that would see us stumble back into camp 13.5 hours later after covering 20.2km of alpine terrain, and gaining over 2,100m of vertical elevation. Our companions for the day were Andrea, Aga, Matthew and Philip from Calgary, who had done Mt. Kerr the day before and were looking to summit the other three.
Routefinding
The day started early from the Little Yoho campground where we headed east to the Stanley Mitchell Hut, used the bridges there to cross the Little Yoho River, and then began the westward hike along an obvious trail towards Kiwetinok Pass. I recommend hiking up this trail (roughly 3.3km, and taking a little over an hour) even if you don't intend to do any scrambling, as it follows the Little Yoho River up to its source at Kiwetinok Lake, passing numerous waterfalls along the way. Nestled between three peaks (Kerr, Kiwetinok and Pollinger), the lake area also offers excellent views of the entire Little Yoho Valley, and an easy climb up to the Kerr/Kiwetinok col (just west of the lake) will provide you with a great view of Kiwetinok Ridge, the Amsikwi River Valley, and a sea of peaks beyond.
Kiwetinok, Pollinger and McArthur all share a connecting ridge and are best tackled together, so we began the steep, snowy climb up the slopes north of the lake towards the Kiwetinok/Pollinger col, and our first climb of the day.
Kiwetinok Peak
As of this writing, Kiwetinok Peak is the most difficult scramble I've ever done. Kane's description for the climb is surprisingly vague in his book given the difficulty rating he's assigned; and, judging by his route photo, we did our climb under more challenging conditions than what he faced. What didn't help me at all is that I had burned through a lot of energy while attempting to close a gap with Andrea and Steven when climbing to the col, and was feeling completely gassed when we started.
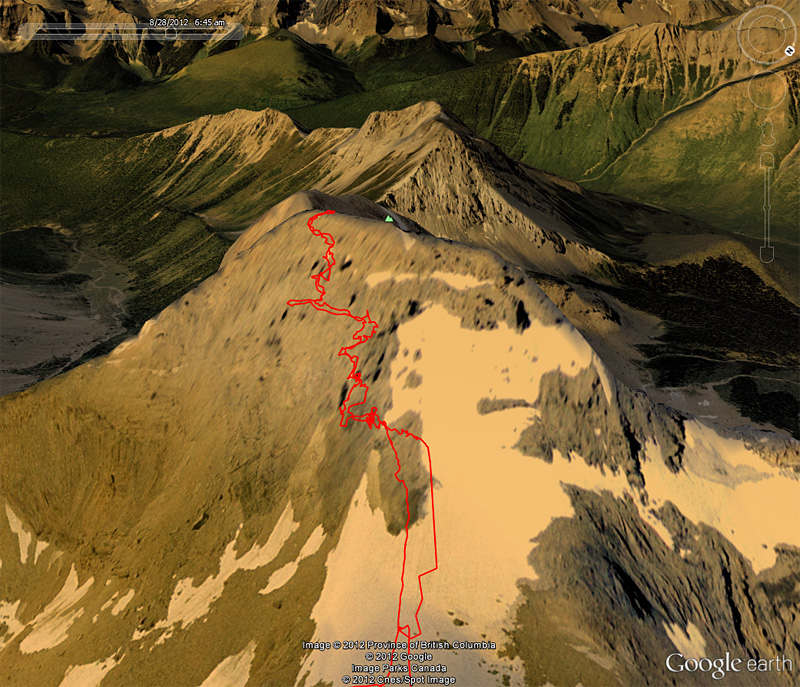
The first section of the climb of Kiwetinok is the most hazardous, as you must climb an ever-steepening ice field until you've gained sufficient elevation to reach the lowest, scramble-able sections of the mountain. As seen in this illustration, the transition between these two areas requires a steep snow traverse above a dangerous run-out, where an uncontrolled slide could easily send you over a rocky cliff-band. An ice axe is here is an absolute requirement, and I very highly recommend the use of crampons. All three of us just booted across in the morning under firmer snow conditions (which still felt sketchy), but Andrea and I both chose to use crampons on the return, and it made a massive difference to both the safety of the traverse and our confidence in performing it.
If you compare our route photo to the similar one featured in Kane's book, you'll notice the dramatic difference in the amount of snow and ice present. Don't count on there being a dry route to the beginning of the scramble; choose your gear accordingly, and get an early start.
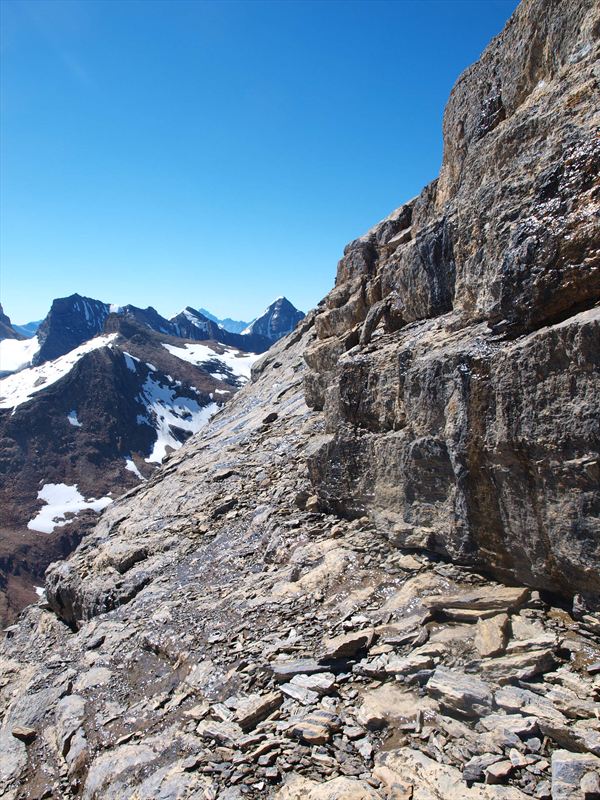
There is no clear route up Kiwetinok, and very few cairns. However, there are a lot of parallel routes available, so if you encounter a section that doesn't look great due to loose rock, there should be a viable alternative nearby. The scrambling area is consistently steep, but the exposure's fairly mild. The scrambling itself is moderate for the most part, but it's the mountaineering section at the beginning and the near constant route-finding required later that earns the difficult rating.
Although the route was recorded with a GPS unit, this data should only be used as a SECONDARY navigation tool.
We decided to stay reasonably close to the snowfield near the beginning of our scramble and gradually drifted to the climber's left as we zigzagged our way up.
At the halfway point of the scramble, you'll encounter a broad and slabby rock-band/shelf. You'll want to traverse along this shelf to the climber's left looking for a weakness in the band leading back to the climber's right that's hidden behind a corner. The scrambling from that point to the summit is much of the same with sections of loose rock and many parallel routes. Reaching the narrow summit ridge won't take you long, opening spectacular views to both the north and west. The original register was still in place and, interestingly, there wasn't a single ascent of the mountain following Kane's (1996) for seven years, which happens to coincide with the publication of the second edition of his book. Perhaps he didn't include Kiwetinok in his first edition?
We retraced our route down the mountain back to the snowfield, where we put on our crampons, carefully traversed the “danger zone”, and then enjoyed a very long glissade back to the Kiwetinok/Pollinger col.

Mt. Pollinger
The ascent of Mt. Pollinger from the Kiwetinok/Pollinger col is an easy hike. Just aim for the high point and walk... if only getting from Pollinger to McArthur were that easy!
Mt. McArthur
The continuation of the trip up to the 3,015m summit of Mt. McArthur would only be mildly more difficult than the hike from Kiwetinok to Pollinger if the latter didn't come to sudden, and very sheer end. As seen in these photos (1, 2, and 3), the crux leading from Mt. Pollinger is a breathtaker; a 10m downclimb down an 80-degree slope where a fall would be a very bad thing.
I took one look at the crux and decided that the bypass, which starts 30m back from this point on the climber's right, would suit me just fine. That was until I took a close look at the traverse involved with the bypass.
The bypass requires you to side-hill along the junction where the steep debris slopes of Pollinger intersect with the cliffs surrounding its summit. The traverse is quite exposed to the climber's right, and worse, has three snow gullies to cross. While the run-out on each is fairly clean, a slip on any of them would send you to the hanging valley, a few hundred metres below, with great expediency. On this day, the first gully had receded from the cliffs and could be easily circumnavigated, but the other two were clearly going to require crampons and an ice axe to negotiate safely. As my crampons were back at the Kiwetinok/Pollinger col, drying in the sun, I decided to suck it up and follow the rest of the group down the crux.

Thankfully, on this day the rock was quite solid, offered consistently good holds, and was, most importantly, completely dry. I wouldn't even contemplate this downclimb if the rock is wet, or as one group encountered, covered in verglas! Even under ideal conditions, you should recognize that this portion blurs the line between scrambling and free-climbing; under anything less than ideal conditions, the crux here needs to be treated as an alpine climb using the necessary gear and protection.
Once you're safely past the crux via one means or another, the rest of the ascent of McArthur is a straight scree and boulder-hopping slog that takes about 40 minutes. Beware that the snowfield directly to the climber's right of the summit is, in fact, the Des Poilus Glacier, and that it's likely not a safe place to venture. Once you've enjoyed the views and a much-deserved rest, retrace your route down the slope to the crux area on Mt. Pollinger.
When our group returned to Pollinger, there was a large raven sitting on the summit cairn, the first I had seen all trip, watching us silently as we approached the crux. I'm not normally a superstitious person, but this struck me as a little ominous. I was quite relieved when I made it up, and over the top, and even more so when the last of our group did the same.
From Pollinger, we hiked back to the Kiwetinok/Pollinger col, recollected the gear we had left, and then plunge-stepped and boot-skied our way down the snowy ascent slope to Kiwetinok Lake. It's here where Steven and I parted ways with Andrea, Aga, Matthew and Philip, and began our ascent of Mt. Kerr.

Mt. Kerr
Mt. Kerr is the most popular scramble in the valley and, thanks to this popularity, there's a well-defined and heavily cairned route most of the way to the north summit. I say most of the way because the trail seemed to disappear about 80% of the way up; however, there are so many viable routes available from that it's not surprising that people spread out and take random lines from there. You'll soon reach the summit cairn of the north summit, but have you really summited Mt. Kerr?
The sources I've checked are split 50/50 on this point, and while Mr. Kane chose the north summit as the true summit in his book, the reality is that the south summit of Mt. Kerr is at least 60m higher and is the one with the register. The good news for completionists is that the south summit is an easy scramble from the north summit, highly scenic, and takes little more than an hour to reach on a round-trip.
To reach the south summit, begin by following the obvious trail down from the north summit along its southerly ridge. This trail will eventually lead you to the west (skier's right) side of the ridge where, before you become cliffed-out, you'll want to pass through a notch on the skier's left that will bring you to the east side of that southerly ridge. This photo of the north summit from the south summit shows this area well, not to mention the evident difference in height. Once you're on the east side of the southerly ridge, the descent to the col between summits is easy, and fairly straight forward.
From the col, you'll want to contour west towards the base of the ramp which leads to the south summit. Surprisingly the ramp is comprised almost entirely of huge, and very long boulders. The boulder-hopping to the summit is pretty quick, just be careful around the gaps that exist between many of the boulders.
The sun was beginning to set as Steven and I reached the south summit, so we didn't linger for long before retracing our steps back to the north summit, and then down to Kiwetinok Lake. The trail back to the Little Yoho Campground seemed to have doubled in length on us during the day, but thankfully the view of the Presidents and the thought of food and rest kept us going... bringing an end to an epic and exhausting day in Yoho National Park.
Considerations
Share this report on:
Make sure you have plenty of water with you when attempting the Kiwetinok, Pollinger and McArthur trio. After passing a small stream on the way to the Kiwetinok/Pollinger col, there won't be anywhere to replenish your supply (beyond snow) for several hours
Further Reading
Alan Kane describes the ascents of all four peaks in "Scrambles in the Canadian Rockies": Kerr (pg.280), Kiwetinok (pg.281), McArthur (pg.282), and Pollinger (pg.282).
This report comes from a three-day trip, beginning with Little Yoho Valley I and concluding with the Iceline Trail.


 and Mt. Sir Sandford (left)")


")


")


")

")


")

