
Little Yoho Valley I
New friends and challenges within Yoho's best secret.
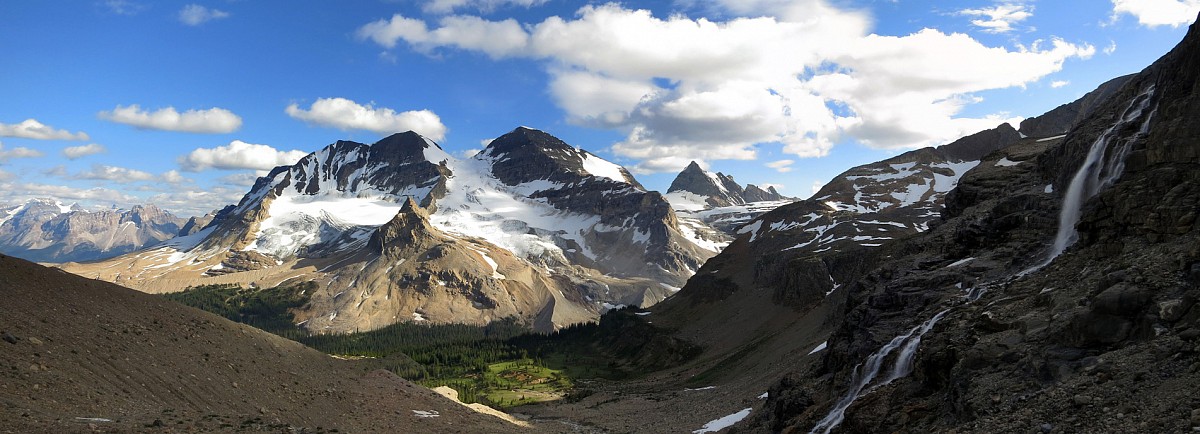
Above: The view of the Presidents and the Little Yoho Valley on the approach to the Isolated/Whaleback col remains one of the most breathtaking vistas I've encountered in the Rockies.
August 03, 2012 / minute read( words)
My plan for this summer was to travel to the numerous provincial and national parks around Alberta to get a feel for what the region has to offer (tons!!), but I couldn't resist a change of plan when I received an invitation from fellow scrambler Steven Song to join him and several others (Andrea, Aga, Matt and Phillip) in Yoho National Park for the August long weekend. My first trip to British Columbia since a ski trip to Whistler and Sun Peaks several years earlier was going to be an ambitious one. The plan was to summit six peaks over two days from a base camp in Little Yoho Valley.
Not only did we succeed in summiting all six peaks, but we managed to do so under perfect weather conditions which simply brought out the best from this magnificent landscape.
Routefinding
The main access to Yoho National Park can be found 22km west from Lake Louise on the Trans-Canada Highway (Hwy 1). From the junction, take the Yoho Valley Road 18km north past the main Takakkaw Falls parking lot (day-use only) to the area reserved for backcountry travellers. There are two routes for reaching the Little Yoho Valley from this parking area; the first is to follow the Yoho Valley Trail directly north towards Laughing Falls; and the second is to backtrack half a kilometre down the road to the beginning of the Iceline Trail (which you'll find to the right (west side) next to a smaller parking area and a day-use facility). We chose to take the valley trail for expediency reasons but exited via the Iceline Trail (described in a separate report).
The Yoho Valley Trail is well maintained and easy to follow, with steps, bridges and even a few paved sections. Steven and I quickly covered the first 4.6 km approach past the Takakkaw and Laughing Falls campgrounds to the waterfall itself, before encountering the first grind of the trip. The switchbacks one must ascend from the main Yoho Valley to the hanging Little Yoho Valley aren't particularly arduous in terms of steepness but can prove a challenging workout when bearing a very heavy pack. After toughing our way through that section, we soon reached the Stanley Mitchell Hut and the campground that would be our home for the weekend.
Although the route was recorded with a GPS unit, this data should only be used as a SECONDARY navigation tool.
Isolated Peak
Even if you're not a scrambler, it pays to hike up to the hanging valley behind the Stanley Mitchell Hut and then towards the Isolated/Whaleback col. There's a lovely meadow with some streams, a wide assortment of wildflowers, and several waterfalls, including a huge waterfall that tumbles from the toe of the Des Poilus Glacier. Many of the best photos from my trip came from this area, and it can easily be reached by following a trail that commences just behind, and to the right of, the Stanley Mitchell Hut.
Those wishing to continue to Isolated or Whaleback from this area should follow the main trail to the point where it climbs steeply towards the large waterfall, and then cross over to another set of trails on the climber's right of the stream. Although it's possible to cross this stream further up the left side (the main trail continues in this direction), or in fact, at the very base of the waterfall (as Steven did), you'll have a much easier/drier time crossing this stream the earlier you do so.

Once past the waterfall and the rocky cliff band it descends from, follow the ramp to the climber's left that brings you around the south face of Isolated Peak. Your objective from here is to reach a broad ascent gully along the western edge of Isolated, which you can do by side-hilling uncomfortably along the scree and debris at the mountain's foot, or by walking along a narrow snowfield which lies adjacent to it. If you choose to walk along the snow, stay close to the rocks and exercise care; the further you drift from these rocks, the more you'll end up on the Des Poilus glacier and subject to the risks associated with glacier travel.
The problem with the “Kane Route” from this point is that it's not shown in the photo at all, and is only vaguely described by the text. This led Steven and I to take a wrong, and more challenging route up the mountain. The goal from the western foot of Isolated Peak is to reach the top of the ridge shown to the right in this photo. It's my understanding that the intended route passes through the notch to the left of this photo, or a similar feature near it, rather than the large gully that ascends the centre of the mountain that we took.
Since our more complicated route worked, and was fairly safe to follow, I'll describe it here.
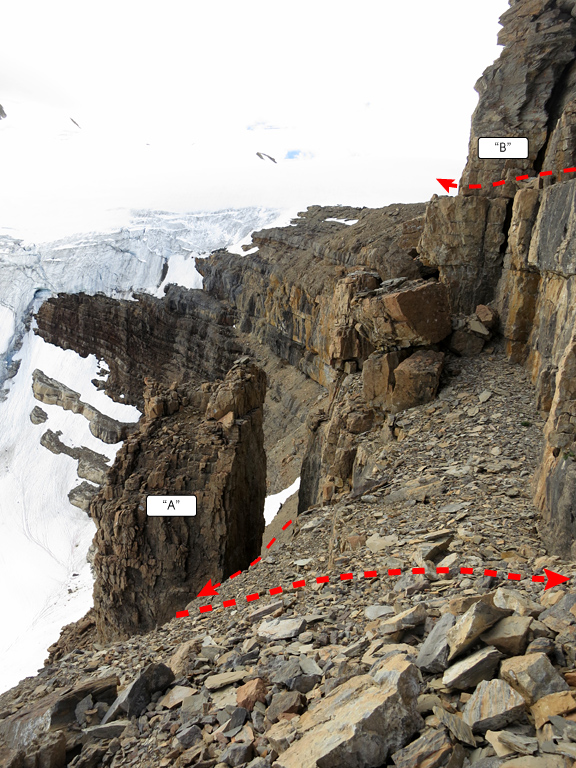
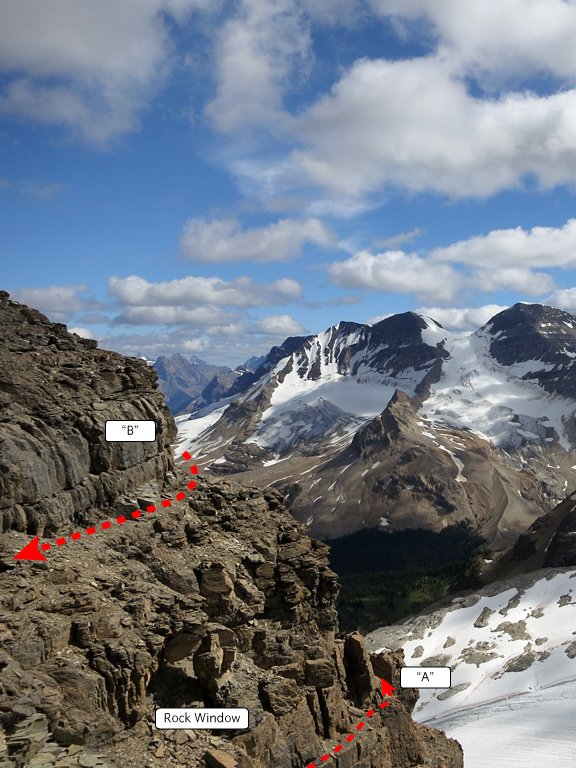
While traversing below Isolated's south face, you will likely notice that the mountain has some fairly pronounced “shelves”, and this alternative route makes good use of them. If you follow the central gully up the mountain, you will eventually encounter an impassable 2m wall mid-way up the mountain. To bypass this impediment, traverse along the “shelf” to the climber's right, through a gap between the mountain and a large pinnacle, and on to the south side. From here, scramble up the obvious diagonal route (eastward) to the shelf above, and then traverse back around to the west side. After passing a rock window, slightly below the shelf to the climber's left, you will return to that central gully above the impediment. Downclimb the gully for a few metres and then head for the cairned chimney visible on the other side. These four photos should (hopefully) help to clarify this alternate route.

From the top of that chimney (or the top of the correct ascent gully) to the summit is a simple scree slog with some boulder hopping, and the route finding is fairly obvious. Enjoy the views, and then carefully make your way down the same route as you ascended as it's very easy to send rocks tumbling down the mountain. Once at the bottom, circle back around the southern face of Isolated towards the Isolated/Whaleback col.
Whaleback Mountain
Given that you'll have already completed the majority of the hard work at this point, there's little reason not to summit Whaleback Mountain (well, aside from inclement weather or darkness). No more than 100m of elevation gain will see you past the pinnacles of the Isolated/Whaleback col and up a scree slope to the summit ridge of Whaleback. From here it's an easy, and very pleasant, kilometre-long ridgewalk to the mountain's summit with impressive vistas in every direction: the mighty President and Vice President to the south, the Lake Louise Group to the southeast, Mt. Daly and Balfour to the east, Yoho Glacier and Peak to the north, and the impressive eastern face of Isolated Peak looming above you to the west.

The summit ridge of Whaleback Mountain is fairly exposed, particularly to the north, but the rock is good, the ridge — while narrow — is rather flat, and the few scrambling portions are quick and easy. After reaching the summit, you can either retrace your steps back to the Isolated/Whaleback col and then descend to the Stanley Mitchell Hut via the hanging valley, or you can complete the full traverse across Whaleback Mountain and then use the trail system to return to the camping area.
Considerations
Share this report on:
There are plenty of accommodation options in the Yoho area, but the best for the Little Yoho Valley are the Little Yoho Campground and the Stanley Mitchell Hut. The campground is well sheltered, has an excellent stream to collect water from, bear poles, picnic tables and an outhouse. The Stanley Mitchell Hut is a lovely log cabin with enhanced amenities and is available for booking by members of the ACC.
Further Reading
Alan Kane describes the ascent of Isolated Peak in "Scrambles in the Canadian Rockies" (p.278) while Mike Potter provides a lengthy description for traversing Whaleback Mountain in "Ridgewalks in the Canadian Rockies" (p.245).
This report comes from a three-day trip and continues with Little Yoho Valley II.


")


")


")


