Yoho Peak
A return trip to one of my favourite areas of the Rockies
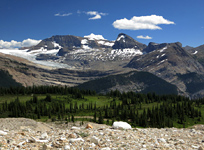
Above: Looking down the Little Yoho Valley towards the giants of the Lake Louise area.
July 18, 2015 / minute read( words)
While the Lake O'Hara area of Yoho National Park (deservedly) receives the majority of the acclaim and adoration, the Little Yoho Valley area to the north merits your attention and is easily one of my favourite areas in the Rockies. Beyond the tourist magnet Takkakaw Falls and the highly popular Iceline Trail, there is a wealth of excellent scrambling with tremendous vistas to be found for those willing to put some effort in on an excellent trail system. You can get a good feel for this area's splendor by scanning over my previous trip reports Little Yoho Valley Day I (Isolated Peak and Whaleback Mountain) and Little Yoho Valley Day II (Kiwetinok Peak, Mt. Pollinger, Mt. MacArthur and Mt. Kerr), where Steven and I blitzed the Kane scrambles in the area with other friends over a weekend.
Unlike those previous outings, my ascent of Yoho Peak with Marina would take me much further north in the park, past a series of beautiful waterfalls, and towards the glacial footsteps of the Wapta Icefield. While the bluebird forecast, unfortunately, gave way to murkiness as we neared the vast glacial moraine of the upper plateau, it couldn't hide the huge views this summit offers of the northern half of Yoho National Park, the Lake Louise group, and the Wapta Icefield. As someone who has seen the Wapta from high peaks to its south, east and north, and even summited a few of its peaks (Olive and St. Nicholas), I was really surprised by how that region looks from the west. With so much visible rock, it's almost like seeing the Wapta area without the existence of the icefield. Perhaps a harbinger of what's to come.
We set out for the mountain only knowing of one route from the Des Poilus bivy area to the Mt. Collie/Yoho Peak col from friends' reports, but would discover two alternative routes on our descent that are far more direct for those tackling this as a day trip rather than as a sub-objective on a multi-day mountaineering adventure.
Routefinding
The Long Approach
You'll find the trailhead for Yoho Peak in the backcountry user's parking area near the north end of the general Takkakaw Falls parking area. To reach this area you need to follow the Yoho Valley Road to its end from the Trans-Canada Highway (Hwy 1), the exit for which you'll find west of Lake Louise near the town of Field. A park pass is required for this area and staff are quite vigilant in checking for these at the head of the road.
Although the route was recorded with a GPS unit, this data should only be used as a SECONDARY navigation tool.
From the trailhead, you'll want to head north along the Yoho Valley Trail for 4.6km to the scenic Laughing Falls and its campground, where you'll soon turn left at a junction with the Little Yoho Valley trail. The steep switchbacking slopes next to the waterfall will be a rude awakening after a fairly effortless walk so far, but you'll make it past this slope soon enough and arrive at your first choice of the day: whether you want to see the lovely Twin Falls from below or not. If you do, you'll want to take the first right turn onto the signed Marpole Connector trail; which traverses the bottom slopes of Whaleback Mountain through a nicely arranged boulder trail to the unremarkable lake for which the trail's named, and from there up to the base of the falls. If you don't, head further up the Little Yoho Valley trail and turn right at the next junction onto the Whaleback Trail. Both eventually lead to the top of the Twin Falls, but the latter route is more direct (1.5km shorter) and saves a fair amount of elevation loss and regain.

As you may have guessed, Marina and I chose to view the falls for which I have no regrets. However, what is regrettable is the rather impenetrable cliff band that makes the Twin Falls possible also means that there's a massive detour needed to get to its top. The illustrated map sign in this area comically undersells how large the detour is on the Whaleback Trail (which descends to here from the hanging valley above) and you will likely question yourself as you continually ascend northward, seemingly towards the Wapta. Rest assured though, after several months of beard growth the trail heads up via a series of short switchbacks to the ridge top, before a long return hike brings you to the top of the falls.
The ascent continues westward from the waterfall area by following a trail to the climber's right of the river. Using an open, boulder strewn area near the Whaleback trail bridge as a reference, you'll find this aforementioned trail mere feet into the trees to the right (north) of this field. Following this trail (which is in excellent shape for an unofficial one) will eventually lead you to a large tarn near the southern base of Yoho Peak where you'll face your second choice of the day: where do you want to ascend?

Sidenote: The “Additional Images” section below this report includes additional maps and illustrations for the following routes.
The Easiest Route
From this point, your easiest, most direct route is to make your way around the left (west) side of the tarn and then upwards diagonally on scree slopes towards an obvious dip mid-mountain on Yoho. This route is strictly hiking with a pleasant ridgewalk awaiting you once you crest the summit ridge, with the summit only a few hundred metres away to the north.
The Scenic Route (Our Ascent Route)
Based on the traditional route from the Des Poilus bivy, this route departs the tarn to the left (west) along a feature referred to as the “Karst Highway”. The objective here is to contour around the significant sub-ridge to the west of Yoho Peak, following the karst and dry creek beds, and crossing open boulder fields (there are numerous cairns and snippets of trail) in order to reach the impressive glacial lake at the base of the Des Poilus Glacier (which is flanked at the north end of the valley by Mont. Des Poilus and Mt. Collie). From here you need to follow a narrow ledge above the lake on the right which eventually lowers you to the moraine, where a long sequence of boulder-hopping and side-hilling awaits.

Your goal on the moraine is to travel by the easiest line available until you near the foot of the glacier (the traditional mountaineering bivy area), and from there grovel up the loose rock towards the obvious col between Yoho Peak and Mt. Collie. I suppose that this col will be even more obvious now as the ACC began the construction of a new hut at this location shortly after Marina and I passed through. The ascent to the col is technically easy, but tedious due to the rubble.
Thankfully the views open up considerably upon reaching the col and, if that weren't enough, the scrambling becomes much more enjoyable as you head up Yoho's northwestern ridge. It should also be noted that the northern approach provides the most aesthetic view of Yoho Peak, which was never a particularly attractive mountain at any other point of our trip. After a few easy slopes, the last push for the summit occurs via a lengthy series of giant blocks that are fun to climb and reminded me of the true summit area on Mt. Kerr.
The Giant Slab Ramp Route (Our Descent Route)
Not wanting to repeat the tedious boulder-hopping and side-hilling of the moraine approach, we explored southward along the summit ridge for an alternative descent; settling for a promising looking slope next (skier's right) to what I've dubbed the “middle finger rock”. It has a bit of an orange and white “finger nail” and, while not super obvious in my photo of it, is much easier to see when you're walking towards it. Descending the first half of the mountain involved a number of small rock steps and a few, short slab sections which were never more than moderately difficult.
When we reached a point where it looked like we'd be cliffed-out, a quick search around a blind corner to the skier's left revealed something rather fantastic: a gigantic slab down ramp leading to an easy scree run to the base of the mountain. The slab ramp is broad (about 5-6m wide), but has a lateral downslope that's exposed to a decent (10-15m) cliff drop and a few wet spots. Having slipped on downsloping slab before I was pretty cautious coming down the ramp, staying well to the skier's left, tiptoeing over wet spots, and making use of every hand-hold available to ensure that any slip would be short and contained. Safely across, I signalled Marina through and she zoomed down like it was the wheelchair ramp at the bank. Most impressively, she didn't die. There may be a happy medium between these two approaches.
The joyous scree run dropped us in a gully between Yoho Peak and its outlying ridge to the west. Following this gully out southward proved to be a very pleasant hike with sections of trail and then a perfectly gravelled dry creek bed which was like pathway from a children's amusement park. We soon reached the tarn, but not before passing a group of rocks protected by a solar-powered electric fence(?!).
I wouldn't recommend this as an ascent route due to the treadmill scree at the beginning and, unless you should bring a printout of my arrowed photo, it can be almost impossible to spot the ramp from below.

Share this report on:
Yoho's trail system offers a variety of possible return routes once you've made it back to the Twin Falls area from the tarn. As we were tired to the extent that any climbing felt soul crushing, we opted to suffer the giant detour again in the hopes that heading out via the Twin Falls campground (rather than the Marpole Connector or Whaleback Trail) would give us a reasonably flat highway all the way back to the trailhead. While we did suffer the indignity of ascending a few small hills, the hike out went by reasonably quickly and we returned to Lake Louise for a well-deserved victory meal.
Sidenote: The 10 hours listed for the mapped route is fast, as we were moving over 80% of the time according to my GPS (which is highly atypical) and at a solid pace. Most groups will require the same time, and possibly more when following a more direct route.


 from the Marpole Connector")


 and Trolltinder Mountain (right) from near the tarn")
")


")