Mount Rainier
Testing bureaucracy and luck on a monster volcano
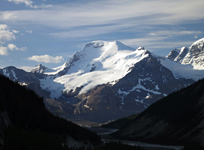
Above: The team descends the glacial east face of Mt. Rainier in Washington State
July 2-3, 2017 / minute read( words)
You could feel the tension throughout the team. This would be the crux of our trip. Far below the crevasse fields and the nightmare menagerie of objective hazards guarding the Pacific’s Northwest highest point, four pairs of eyes were nervously following the Ranger as he alternated between the computer and a nearby collection of papers; a curiously large pair of shears at his side, ready for some dark and unknown purpose. Had it all come to this? Had the 14-hour drive from Calgary, the numerous Facebook strategy sessions, the paperwork coordination, the careful study of Ranger Station locations and hours, the agreed upon alpine start to get here… had it all been for nothing?
A voice deep inside felt the need to inform the Ranger that I was the hero of my own personal narrative and that our ascent of Rainier was a matter of providence, and what arbitrary limitation could come between a man and his destiny, anyway? Before that could happen, he thankfully turned and asked us a random question about pickets. “Oh, you mean those things that all of my mountaineering friends immediately regret carrying?”, said that same voice, failing once again to receive the brain’s permission to access vocal chords.
The interaction continued on like this, with a most inopportune Windows Update (as though there's any other kind) extending matters for several painful minutes. Eventually, he was able to access the information he needed and was ready to deliver the news. Our team (Dalia, Jason, Raf and I) had come from Alberta and Colorado with the hopeful expectation that we could just crash at Camp Muir and then climb the northwest's most popular mountaineering objective between Canada Day and the 4th of July, without any kind of reservation, like a bunch of jackasses. Would the universe reward our boldness, perhaps even with day-after-day of near-perfect, bluebird conditions? Hell yeah, it would!
Tackling Rainier
Permits and Paperwork
As I alluded to above, there is paperwork, fees, and the collection of precious permits involved in the climbing of Mt. Rainier. It begins with each member paying a Climbing Cost Recovery Fee online (which, at the time, came to about $50 Cdn.), which helps the Park Service perform rescues and maintain services on the mountain. That may seem a bit steep, but the services they provide there are top notch. After the fees, your team needs to complete a document that covers key contact information, your planned itinerary, vehicle information, the gear you intend to bring, and the team's experience on Rainier. Once you've addressed those two points, your team is then eligible to request climbing permits... a certain amount of which can be picked-up on a walk-up basis from several different Ranger Stations around Mt. Rainier National Park. If you prefer to make a reservation, you better have a clear picture of what weather and conditions will be on Rainier a good season or two in advance because those permits disappear early in the year.
Depending on the walk-up permits can be risky. On the day we arrived at the Paradise area, July 2nd, they only had 8 permits available and the first two parties immediately gobbled up 7 of those. If that's your plan, be first in line at the earliest opening station.
Without permits, you cannot climb above 11,000 ft. on any glaciers in the park; and soloists take note: you need written permission from the Park Superintendent to scale the mountain as a team of 1. In other words, if you're not presently sponsored by Red Bull, forget about it.

Onwards to Camp Muir
While the ascent to Camp Muir from the Paradise climber's parking lot (found about 500m west of the main parking area) isn't technically challenging, it does require a lot of grunt work with over 1,400m of elevation gain. Once you’ve passed through a brief section of forest on a trail the rest of the route will become obvious as you’ll see a gently curving/ascending ridge to your left with, on most summer days, a ridiculous mass of humanity passing along it. Although the dry sections of the ridge have numerous trails to choose from, the routefinding is easy: go with whichever looks to be the most direct, and don’t sweat it; the corrections you may need to make will be minor. Eventually, you’ll reach the Muir Snowfield.
If you’re climbing in the summer you’re going to want to reach this point early in the day as the snow can get quite soft by the afternoon. That said, we ascended through this section around 11:00 am on one hot day in July and descended around 5:00 pm on another and never postholed, so I wouldn’t bother with snowshoes. Just expect to work harder if you’re late.
After this snow ascent lies the majesty of Camp Muir; a small scattering of ancient looking buildings and bathrooms along a small ridge, with a village of brightly coloured tents somewhat sheltered from Rainier’s winds on the other side. Raf and I were the first of the team to arrive, and swiftly set to claiming territory for our tents, and to build ours to escape the microwave-like blaze of the sun. It had taken us 4.5 hours to get there at a relaxed pace.
Although the route was recorded with a GPS unit, this data should only be used as a SECONDARY navigation tool.
[Above is the Disappointment Cleaver route from Camp Muir to the summit, but I also have a GPS track covering the route from the Paradise trailhead to Camp Muir.]
If you're camping at Camp Muir, you'll definitely want to get there before 5 pm in order to catch the information briefing from the Rangers stationed there. Although you should already have done your homework on the DC route, in the span of about 15 minutes the Rangers cover the route details, conditions, warnings about specific objective hazards, suggested time limits for reaching certain landmarks, suggested times for beginning your ascent to avoid the RMI parade, expected weather, and so on. It's truly fantastic stuff.
With a big day ahead, we ate dinner early, admired a lovely sunset, and nestled as best we could into our tents with a plan to get up at 12:15 am.
Headlamps Aimed at the Summit
Unfortunately, the winds picked up considerably after we went to bed and my ambiguously anchored tent had been such a constant source of anxiety that 12:15 am saw me rise after another restless evening; facing a big climbing day on a total of 6.5 hours of sleep going back three nights.
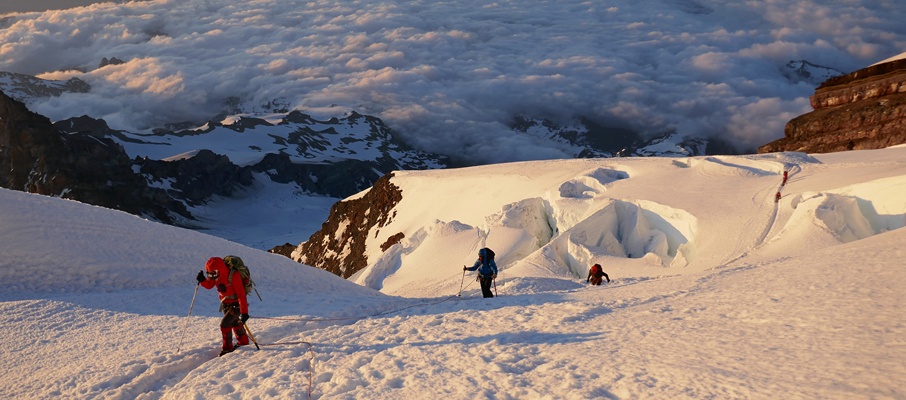
After the usual breakfast and gear prep, we popped on our crampons (you’ll wear them the entire way even though there are a few short rock sections), roped up, and began across the mellow Cowlitz Glacier towards the Cathedral Gap at 1:15 am. The glacier crossing was an easy ramp, the gap merely a hike around a large rock face, and we were soon passing the next campground on the Ingraham Glacier with 10 interspersed rope teams illuminating the route ahead like Christmas lights.
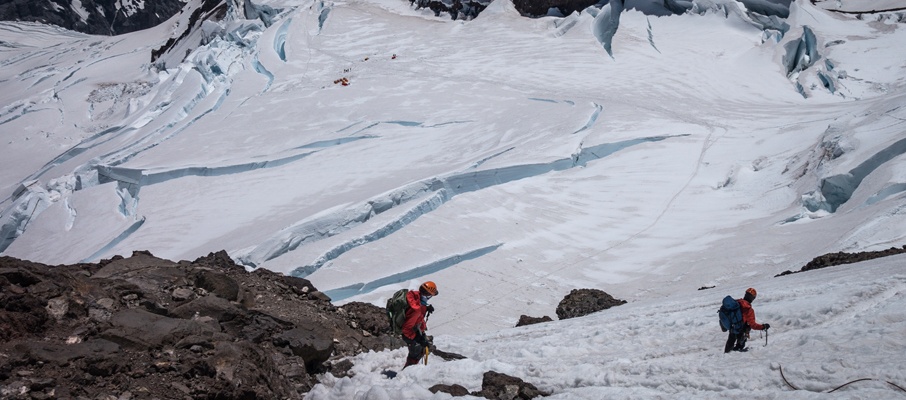
The sketchiest part of the ascent soon followed. After heading straight up the Ingraham Glacier for a few hundred metres you need to make a traverse right to the base of the Disappointment Cleaver that takes you under two dangerous features known as the “Icebox” and the “Bowling Alley”. The Icebox (see images 55 and 56) is a massive icefall that can calve at any moment and is responsible for the worst accident ever on the mountain when 11 people were killed in 1981. Meanwhile, the Bowling Alley (see image 60) follows along the side of the Disappointment Cleaver ridge and is easily susceptible to rockfall, especially if there are rope teams travelling above you.
However, what neither the 24-page official guide nor the Ranger briefing mentioned was how narrow and exposed that entire traverse is (see image 59). In the pitch-blackness of the night, it looked like we were following a half-metre wide ledge next to open air, and it quickly dawned on me that being roped up here was a dangerous liability. If one person slides off here, the rest of you will soon follow. It would only look slightly better in daylight upon our return, as the breakage of the icefall this year had left a bit of a ledge below, perhaps offering a chance to halt a slide before vanishing into the gigantic crevasses beyond. Reaching the start of the comparatively broad Disappointment Cleaver ridge after this section was a great relief.
Cleaving Our Way to the Top
Much of the Disappointment Cleaver was dry rock for us, and we found the ascent to be an easy scramble aside from the minor annoyances of scrambling in crampons while managing the rope (we short-roped to reduce the chance of triggering rockfall). When we weren’t on rock, we simply followed a series of switchbacks etched into the mountainside by a thousand feet. The promise of dawn gradually spread across the eastern horizon as we diligently made our way up the ridge.
One of the surprising things to us, in retrospect, was just how much mountain was left after we topped out on the Disappointment Cleaver. With no distinctive features above, just crevassed glacier (see images 25 and 53), you could never get a true sense of scale for what laid ahead. Had I eyed my GPS at that moment, I’d have seen that we were at 3,740m (12,270 ft.) with another 650m (2,133 ft.) to go!
Most years the route from the Cleaver to the summit is reasonably direct, but as glacial landscapes are never static, the established line this season would force us to do a lot more traversing than usual. Due to this more circuitous route, we would be forced to pass below a feature the Rangers had named “The Wave”. While not quite a serac, this unique snow feature overhangs/overhung the established route and threatened to rain ice, if not outright collapse, upon those passing underneath it at an unfortunate time.
The Ranger’s had given very specific direction to amateur teams to cooperate near this feature, and ensure that no team would be forced to stop in this area to allow the passing of another. Unfortunately, either the same direction wasn’t given to the ‘professionally’ guided teams, or they didn’t feel it applied to them.
After we patiently allowed one descending team to pass through, we began our traverse below The Wave. A third of the way across, and well committed, another descending guided team arrived and, seeing us, immediately began crossing anyway. To compound that lack of consideration, this team of 6 then met us around the most dangerous point and forced us to climb onto the steep ice to allow them past.

One of the guides, seeing me with my crampons front-pointing and my pick driven in to cling to the steep slope, had the audacity to say “Be careful there”. “Yeah, thanks, asshole… I’m sure there’s a real panic for you to get down at 6:00 am on a perfect bluebird morning”, replied the internal voice mentioned back in the introduction. Had they been willing to wait 5 minutes, we could have passed each other, safely, on flat snow. Thanks a bunch.
Anyway, the ascent felt like it continued for ages as we followed the road far to the right, then all the way back to the left, and then right/left some more. We eventually crested a ridge and I was so looking forward to finally laying my eyes upon the crater rim, only to be deflated by yet another vast looking snow slope. But we persisted, eventually cresting the promised crater rim into the loving embrace of cold, 100kmph winds. Mid-way across the snow-filled crater we freed ourselves of the rope, ploddingly strode past the penitentes, and then powerwalked our way up the last dirt slope to Rainier's summit.
The long climb and the days of near-sleepless travel had taken their toll on the team and, after the requisite photography work, we all settled in for a good break in a sheltered location of the crater. It had taken us 7.5 hours to ascend the 1,482m from Camp Muir, which is admittedly a tad slow (the suggested target is 5-6 hours) but counts nonetheless.
Share this report on:
The descent involved a simple re-tracing of our ascent route. We passed back underneath The Wave without incident, and only had some minor difficulties with postholing on portions of the Disappointment Cleaver. Once we had finished the traverse below the Icebox and Bowling Alley, we were pretty much home-free as far as any real hazards.
Camp Muir had returned to its all-out afternoon baking mode by our arrival and, after weighing the luxury of rest against the luxury of escaping the blazing sun, we found the energy to pack our camps up and flee down the mountainside to the promised shade of the forests below. Having timed things to take advantage of the soft footing of the Muir Snowfield, we were able to turbo plunge-step our way down past startled tourists, reaching the parking lot and our wonderfully comfy street shoes in a mere hour and a half. Seeing Raf and I with a truck load of gear arrayed around us, and the unmistakable aura of dirt, sweat and fatigue, some of the tourists asked us where we had been and revered us with wide-eyed stares, like rock-stars, upon learning that we had just been to the top of the monster volcano before them. This is, frankly, how every mountaineering ascent should end.


")


")


")


")